Prepare the scene and the buildings
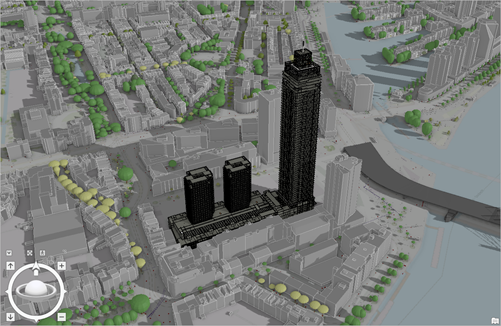
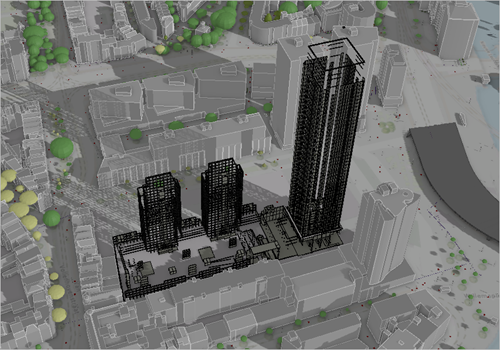
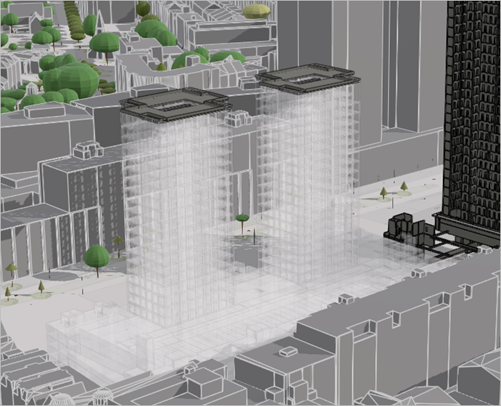
You will first prepare the 3D scene in ArcGIS Pro. You'll use a pre-existing 3D scene representing Rotterdam's city center, add the De Zalmhaven complex buildings to it, and fine-tune the configuration of the scene so that it is ready to share with your audience. The result will look like the following example image (the De Zalmhaven complex appears in dark gray tones).
Note:
It is becoming more common for city governments to maintain a 3D scene representing the current state of their city. That scene can then be used by various parties, such as architecture and construction firms, as a backdrop for their new projects. The city government can also use the scene for urban planning and the assessment of new development projects.
Download the data and create a 3D scene
First, you'll open ArcGIS Pro and load the 3D web scene representing Rotterdam's city center. Then, you'll download the BIM data representing the De Zalmhaven complex.
- Start ArcGIS Pro. If prompted, sign in using your licensed ArcGIS account.
Note:
If you don't have an organizational account, see options for software access.
- Under New Project, click Start without a template.

You'll now open a web scene representing the Rotterdam city center in ArcGIS Pro.
- On the ribbon, click the View tab. In the Windows group, click Catalog Pane.

- In the Catalog pane, click Portal and ArcGIS Online. In the search box, type Rotterdam City Center owner:Esri_Tutorials and press Enter.
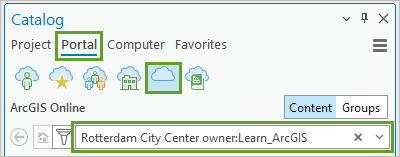
- In the list of results, right-click the Rotterdam City Center web scene and choose Add And Open.

After a few moments, the 3D scene appears.
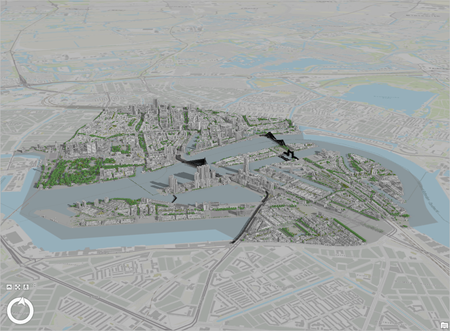
You will use it as the backdrop for the De Zalmhaven complex.
Note:
You can also view that web scene in your web browser, where it is accessible to everyone. To learn how to create such scenes, see Create a web scene to support construction planning.
- In the Contents pane, review the layers that compose the Rotterdam City Center scene.
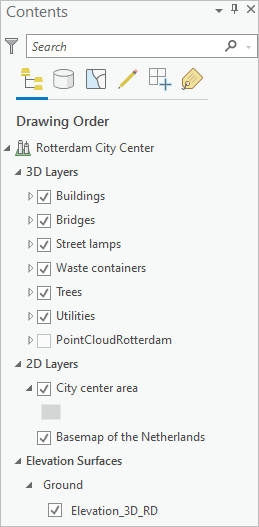
Besides the basemap and ground layers, the scene includes several feature layers, such as Buildings, Bridges, and Trees. You'll explore the scene to familiarize yourself with it.
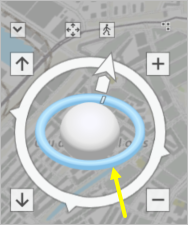
- In the scene, above the Navigator wheel, click the Show full control button.

The Navigator wheel expands to include 3D navigation functionality.
- Use the middle Navigator wheel to tilt and rotate the scene.
You can also use the mouse wheel button to zoom in and out, and you can press the left mouse button and drag to pan.
Tip:
To learn more about the options for 3D navigation, see Navigation in 3D.
- Zoom in and move through the scene to observe it.
The different layers come together to create an engaging, informative cityscape. You'll now save the project.
- On the Quick Access Toolbar, click Save.

- In the Save Project As window, browse to any location on your computer to save this project, such as the Documents folder. For Name, type De_Zalmhaven_complex_for_sharing. Click Save.
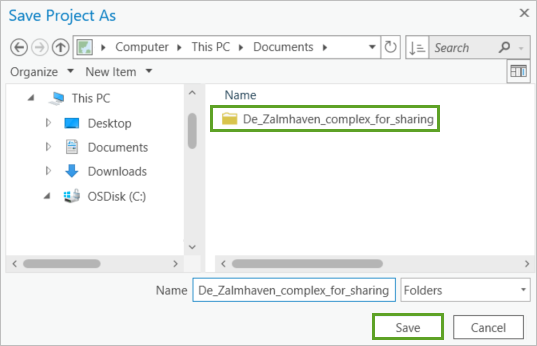
A folder containing this project's data with the name De_Zalmhaven_complex_for_sharing has been created.
Next, you'll download and extract the BIM data representing the De Zalmhaven complex.
- Download the De_Zalmhaven_complex.zip compressed folder on your computer.
Note:
Depending on your web browser, you may be prompted to choose a file location before you begin the download. Most browsers download to your computer's Downloads folder by default.
- Locate the downloaded De_Zalmhaven_complex.zip file, right-click it and extract the contents to the De_Zalmhaven_complex_for_sharing folder that was created when you saved the ArcGIS Pro project.
In this section, you opened a 3D web scene in ArcGIS Pro, downloaded BIM data, and saved the project.
Add digital building models to the scene
The planned De Zalmhaven complex contains two buildings, a high-rise and a mid-rise. You'll now add the digital models that represent these buildings to the scene.
Note:
A digital model is usually created in a native format, such as Revit, Vectorworks, or Allplan using BIM software. ArcGIS supports the Revit and IFC exchange formats. In ArcGIS, the digital model is then imported as a workspace where it is represented as a set of datasets and feature classes. To learn more about the BIM workspace see BIM files as BIM workspace.
In this tutorial, the two buildings are in the IFC format.
- In the Catalog pane, click the Project tab. Expand Folders > De_Zalmhaven_complex_for_sharing.
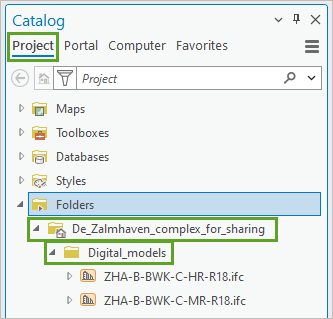
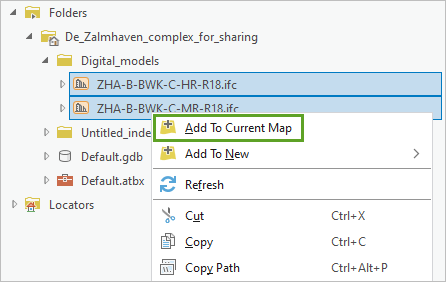
- Press the Shift key, and click ZHA-B-BWK-C-HR-R18.ifc and ZHA-B-BWK-C-MR-R18.ifc to select them. Right-click and choose Add To Current Map.
Note:
If the ZHA-B-BWK-C-HR-R18.ifc and ZHA-B-BWK-C-MR-R18.ifc files don't display, right-click De_Zalmhaven_complex_for_sharing and choose Refresh.
After a few moments, the two buildings appear in the scene.
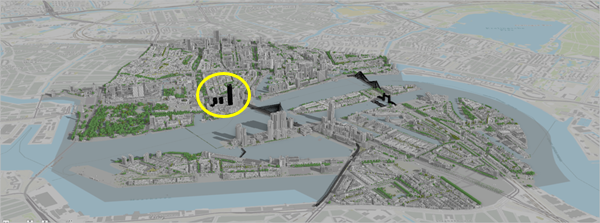
The digital building models are added as building layers. They have already been georeferenced, so they appear at the right location in the scene.
Note:
You can learn how to georeference BIM data in Geolocate a 3D digital building model.
- In the Contents pane, right-click the ZHA-B-BWK-C-MR-R18 building layer, and choose Zoom To Layer.
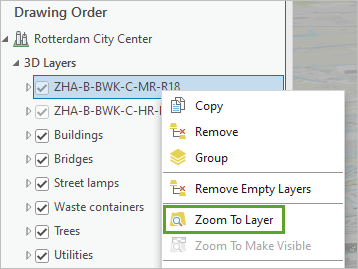
The scene's camera zooms in to the mid-rise building.
- Zoom out, pan, and rotate until you obtain a good view of the De Zalmhaven complex, like in the following example image.
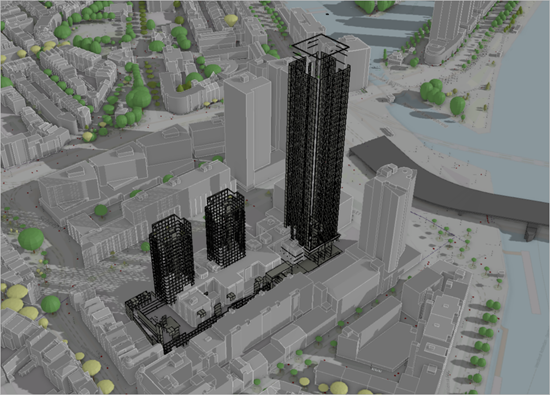
In this section, you added the De Zalmhaven buildings to the scene.
Hide older buildings from the scene
You'll now modify the scene to display the two buildings optimally for your audience. At the location of the future De Zalmhaven complex, you may notice that there are currently two older buildings displaying. You will hide the older buildings to make space for the new ones.
- Review the scene and identify the two gray buildings competing for the same space as the De Zalmhaven complex.
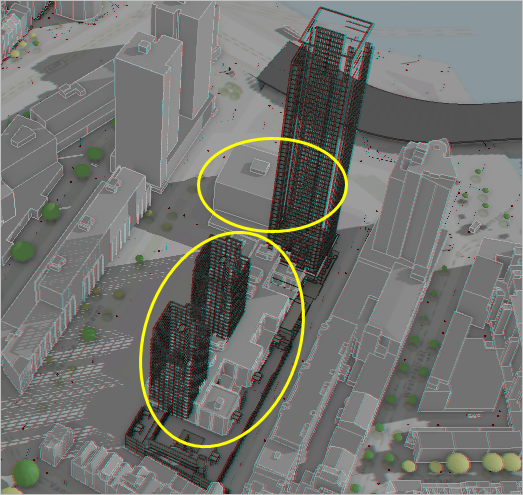
Next, you must find the IDs of these two older buildings.
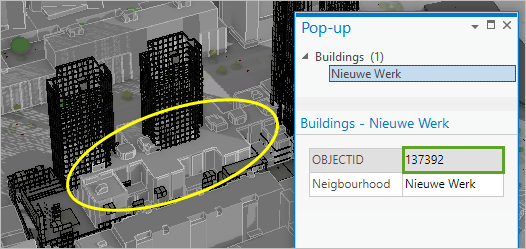
- Click the first older building to display its informational pop-up and write down its ObjectID value (137392) for later use.
Note:
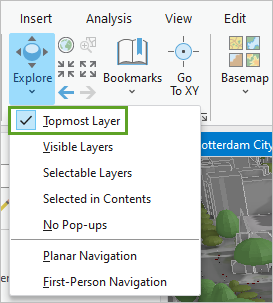
If the pop-up does not display, on the ribbon, click the Map tab. In the Navigate group, expand the Explore down arrow, and make sure the Topmost Layer option is selected.
- Close the pop-up.
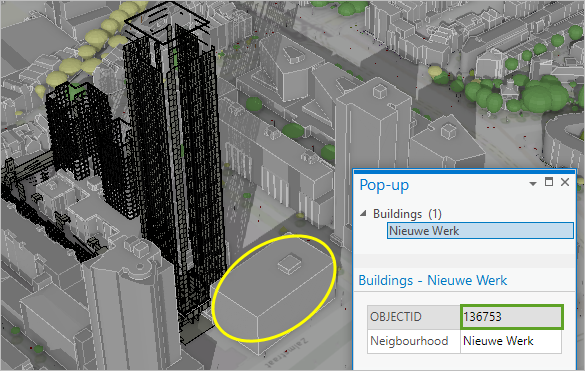
- Similarly, obtain the ObjectID value for the second older building (136753), and close the pop-up.
Note:
If necessary, you can rotate the scene to better see that second older building.
Next, you'll form a definition query with those two building IDs to exclude them from the display.
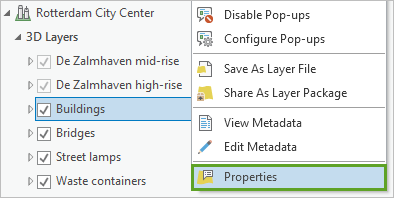
- In the Contents pane, right-click the Buildings layer and choose Properties.
- In the Layer Properties: Buildings window, choose Definition Query. Click New definition query.
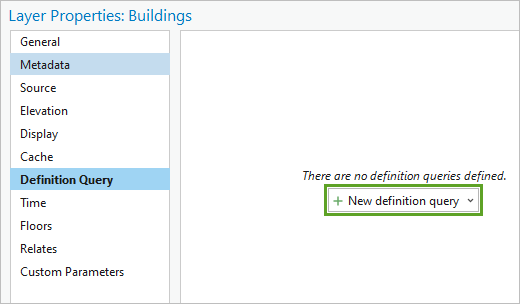
- Under Query1, form the query Where OBJECTID does not include the value(s) 137392, 136753.

- Click Apply and click OK.
The Buildings layer refreshes and redraws without the two older buildings.
Note:
The two buildings are only removed from sight within your ArcGIS Pro project. They are not removed from the original web scene.
- Press Ctrl+S to save the project.
In this section, you removed two older buildings from the scene.
Change the visibility of the building layers
You'll now customize the appearance of the De Zalmhaven building layers. First, you'll rename them.
- In the Contents pane, select the layer ZHA-B-BWK-C-MR-R18 and click it again to edit it. Type De Zalmhaven mid-rise.
- Similarly, rename the ZHA-B-BWK-C-HR-R18 layer to De Zalmhaven high-rise.
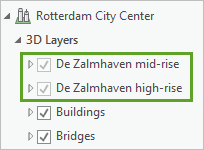
You'll explore the structure of the building layers.
- In the Contents pane, click the arrow next to the Zalmhaven mid-rise layer to expand it.
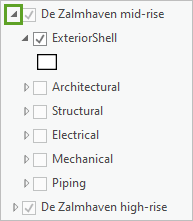
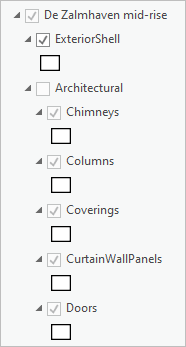
The digital model is organized into several disciplines: Architectural, Structural, Electrical, Mechanical, Piping, and Infrastructure, currently turned off. There is also an ExteriorShell layer, which is turned on by default.
- Expand some of the disciplines to explore them.
Each discipline is composed of categories. For instance, the Architectural discipline contains categories, such as Chimneys, Columns, and Coverings, and Doors.
Note:
To learn more about discipline, category and exterior shell layers, see Work with a building layer.
- Optionally, turn some of the mid-rise discipline and category layers on and off, and observe the effect in the scene.
- Under De Zalmhaven mid-rise, turn off the ExteriorShell and turn on all disciplines.
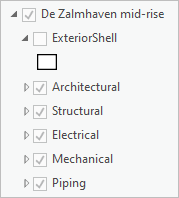
After a few moments, in the scene, the mid-rise building redraws with many more construction details.
- In the Contents pane, click the arrow next to Zalmhaven mid-rise to collapse it back.
- Similarly, expand the De Zalmhaven high-rise layer, turn off ExteriorShell and turn on all the disciplines. Leave the De Zalmhaven high-rise layer expanded.
- Explore the scene, and observe how the two De Zalmhaven buildings seamlessly integrate with the rest of the scene.
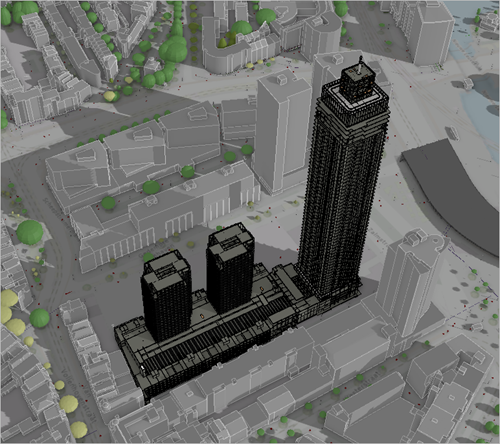
In this section, you customized the display of the digital building models, changing the visibility of its disciplines and category layers.
Customize the bookmarks
Next, you'll customize the scene's bookmarks to help your audience navigate to relevant views of the De Zalmhaven complex.
- On the ribbon, click the Map tab. In the Navigate group, click Bookmarks, and choose the Overview bookmark.
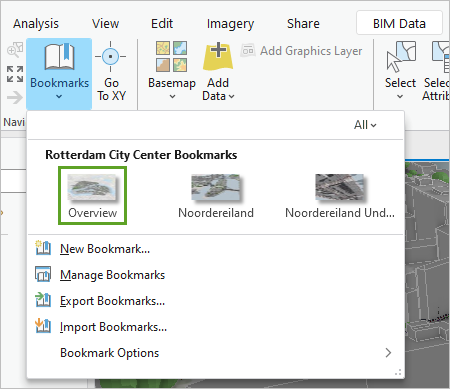
The camera navigates to the bookmarked view.
- Similarly, navigate to the other two bookmarked views.
You can see that the Noordereiland bookmarks are not relevant for the De Zalmhaven project. You'll delete them.
- On the ribbon, in the Map tab, click Bookmarks, right-click the Noordereiland bookmark and choose Remove Bookmark.
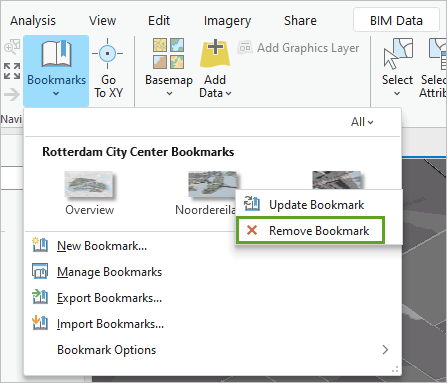
- Similarly, remove the Noordereiland Underground bookmark.
You'll now create bookmarks focused on the De Zalmhaven complex project.
- In the scene, zoom, pan, rotate and tilt to get a view similar to the one in the following example image.

- When you are finished, on the ribbon, on the Map tab, click Bookmarks and choose New Bookmark.
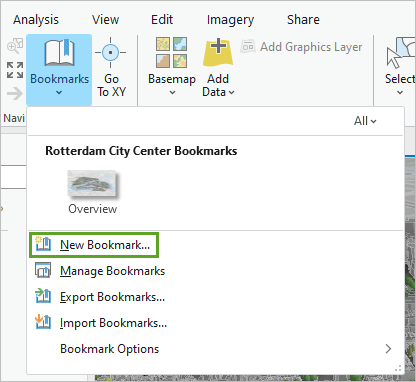
- In the Create Bookmark window, for Name, type De Zalmhaven complex. For Description, type Overview of the De Zalmhaven development project.
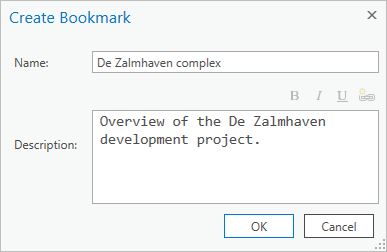
- Click OK.
You'll create a second bookmark, this time showing an underground view of the De Zalmhaven complex.
- Pan and zoom to show a clear view of the De Zalmhaven complex underground, such as in the following example image.
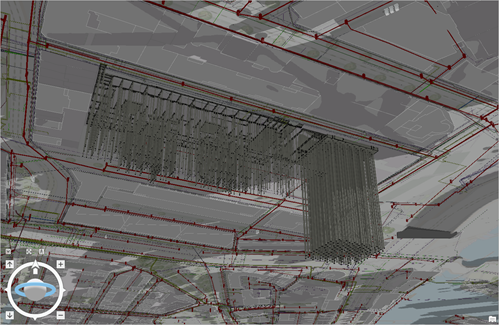
- Create a bookmark named De Zalmhaven underground and described as De Zalmhaven complex foundation.
You now have three bookmarks that are relevant to your scene's goals.
- Test the bookmarks by clicking them and navigating to their corresponding views.
- Click the De Zalmhaven complex bookmark to continue the tutorial with a good above-ground view of the buildings.
- Press Ctrl+S to save the project.
In this section, you deleted two older bookmarks and created two new ones focused on the De Zalmhaven complex.
Add a building filter to the scene
You will now define a building filter to help visualize the foundation structure of the De Zalmhaven high-rise. A building filter is a predefined view of a building layer where only specific elements display.
- In the Contents pane, click the De Zalmhaven high-rise layer to select it.
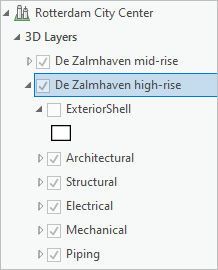
- On the ribbon, click the BIM Data tab. In the Filter group, click Refresh Filter Values.

After a few moments, the Building Filter button activates.
- Click Building Filter and choose New Filter.
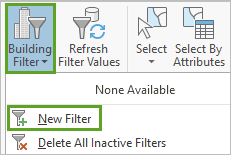
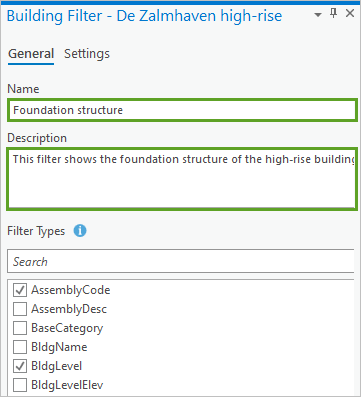
- In the Building Filter - De Zalmhaven high-rise pane, on the General tab, provide the following parameter values:
- For Name, type Foundation structure.
- For Description , type This filter shows the foundation structure of the high-rise building for the De Zalmhaven complex.
- For Filter Types, accept the defaults, since, in this case, you don't need any additional categories.
You will limit the filter display to only show certain category elements of the high-rise building.
- Click the Settings tab, and click the arrow next to Filter Block to expand it.
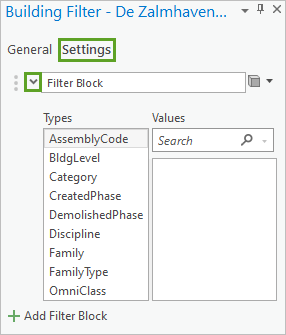
- Under Types, choose Category.
Under Values, a list of all the category layers appears.
- In the list of Values, check the boxes for column, footing, and pile.
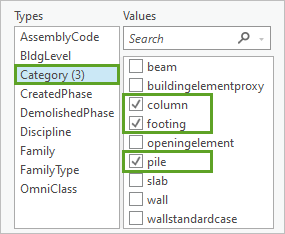
The scene updates to show only the column, footing, and pile category elements for the high-rise building. These elements are relevant for the foundation structure.
Next, since the filter you are building is focused on the building foundation, you will limit the display to the lowest floors.
- Under Types, choose BldgLevel.
Under Values, all building levels are listed from the ground floor (00) to the 62nd floor (in this building layer, the floor names are written in Dutch).
- In the Values list, check the boxes for the floors 00, 00a, and 01.
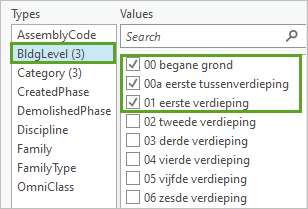
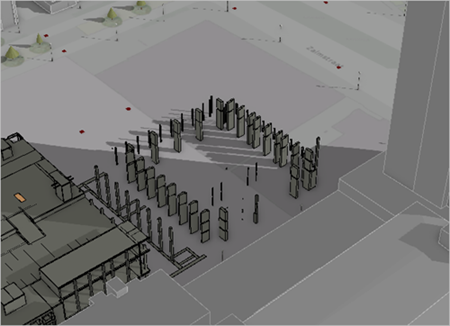
The scene updates, showing only the lowest floors of the building structure.
- In the scene, zoom in, rotate, and pan to observe the high-rise foundation structure from above.
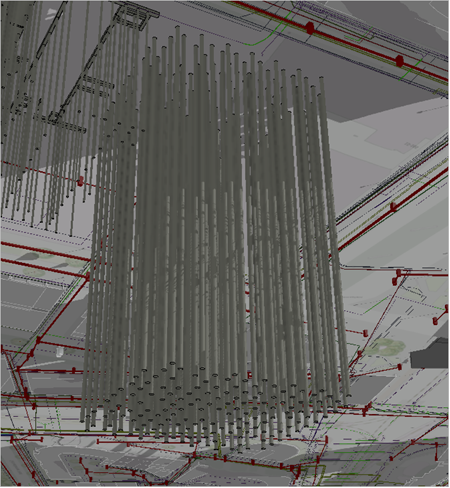
- On the ribbon, click the Map tab. Click Bookmarks and choose De Zalmhaven underground.
The scene updates to show the underground building foundation.
- Zoom in to the high-rise foundation and explore it.
- On the ribbon, on the Map tab, click Bookmarks and choose De Zalmhaven complex.
The scene updates to show the De Zalmhaven complex from above.
- Close the Building Filter - De Zalmhaven high-rise pane.
Now that the filter is defined, you can turn it off or on.
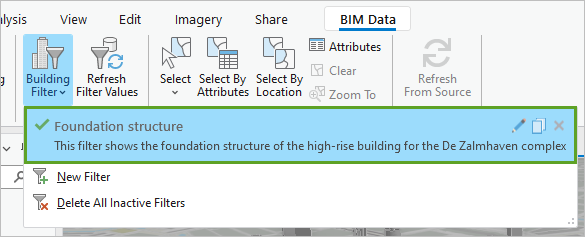
- On the ribbon, on the BIM Data tab, click Building Filter.
The Foundation structure filter is highlighted in blue and has a green checkmark, showing that it is on.
Note:
When the filter is turned on, the scene will only show the elements that you selected for that building, even if all the disciplines and categories are turned on in the Contents pane.
- Click Foundation structure to turn the filter off.
On the scene, the high-rise building updates to its full display.
- Optionally, turn the filter on and off again.
- Optionally, you can create a similar filter for the De Zalmhaven mid-rise building.
- Press Ctrl+S to save the project.
In this section, you created a building filter for the De Zalmhaven high-rise building. Your scene is now ready to share. Next, you will learn about two different sharing options and how to choose between them.
Choose the right sharing option
The scene you've built, integrating the planned De Zalmhaven complex into the Rotterdam cityscape exists only on your computer, as an ArcGIS Pro project. You'll now share it as a web scene to ArcGIS Online to make it available to a larger audience. Since all the layers from the original scene (Buildings, Bridges, Trees, and so on) are already hosted in ArcGIS Online, you won't need to republish them. The only new items that need to be shared are the De Zalmhaven building layers, and the overall scene wrapper that you'll save as a new web scene.
You will learn how to share building layers to ArcGIS Online using two possible methods: you can create web scene layers from scene layer packages or from associated feature layers. The two methods differ in the capabilities they offer, as well as the number of credits they use, as listed in the following table.
| Web scene layers from scene layer packages | Web scene layers from associated feature layers | |
|---|---|---|
Visualize the buildings (Building explorer) | Yes | Yes |
Pop-ups | Yes | Yes |
Predefined filters | Yes | Yes |
Edit the geometry or attributes of the buildings | No | Yes |
Search capabilities | No | Yes |
Credits use | Minimizes credit use | Uses more credits |
The first method creates scene layer packages on your computer and publishes them to ArcGIS online. This saves the credit cost of performing data creation in ArcGIS Online. The second method generates scene layers from associated feature layers that are created directly in ArcGIS Online. For more information about usage of credits in ArcGIS Online, see Understand credits in ArcGIS Online.
In the rest of the tutorial, you'll use the two sharing methods in succession to create two web scenes. You'll understand in what circumstances you would choose one method over the other, and learn the detail of both workflows.
Share a 3D scene for visualization
In this first sharing scenario, you are the data manager for the architecture company designing the De Zalmhaven complex. You want to share the web scene with the Rotterdam community and the general public, so that they can better visualize the upcoming construction within its urban context. You want the web scene to have the following capabilities:
- Offer a general visualization of the two buildings within the larger urban context.
- Enable a detailed exploration of the buildings' disciplines and categories, as well as building levels.
- Contain a filter to visualize the building foundation.
The first sharing method (web scene layers from scene layer packages) offers all these capabilities, so you will choose it, since it also allows you to minimize the use of credits.
Prepare the scene for sharing
First, you'll ensure that the layers and scene view are set up as you want them to be published. Then you'll provide essential information about the web scene.
- If necessary, in the Contents pane, expand the De Zalmhaven high-rise and De Zalmhaven mid-rise layers and ensure that, for both, ExteriorShell is turned off and all disciplines are turned on.
- On the ribbon, click the Map tab. Click Bookmarks and choose the De Zalmhaven complex bookmark.
Next, you'll enter the information for the new web scene.
- On the ribbon, on the Share tab, in the Share As group, click Web Scene.

The Share As Web Scene pane appears.
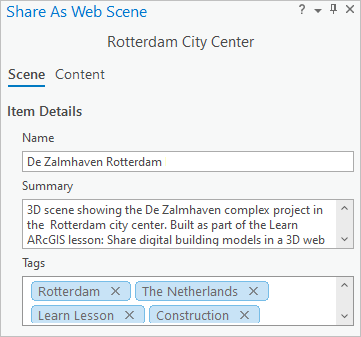
- In the Share As Web Scene pane, for Name, type De Zalmhaven Rotterdam and add your initials, for example, De Zalmhaven Rotterdam YN.
Note:
As you create the web scene, make sure its name and the names of its components are unique across your organization. Adding your initials at the end of the scene name ensures that other people in your organization can also complete this tutorial.
- For Summary, type or copy and paste 3D scene showing the De Zalmhaven complex project in the Rotterdam city center. Built as part of the tutorial: Share digital building models in a 3D web scene.
- For Tags, accept the current tags.
The tags come from the original Rotterdam City Center scene.
- Under Location, for Folder, accept the default, choose a destination folder in your ArcGIS Online account, or create a new one.
- For Sharing Level, choose Everyone.
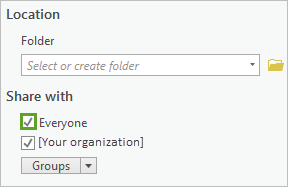
This will make the web scene available publicly without restriction. This is the appropriate choice as you want to share the scene with the Rotterdam community at large.
In this section, you set up the scene for sharing and provided essential information about the web scene. You will continue the sharing process in the next section.
Configure the web scene layers and share the scene
You will now configure the web scene layers and publish the scene to ArcGIS Online.
- In the Share As Web Scene pane, click the Content tab.
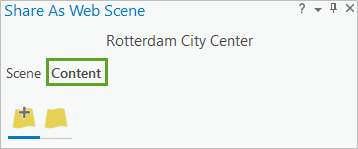
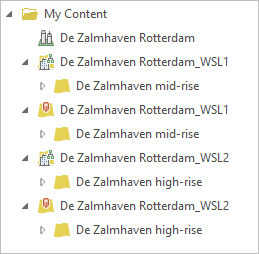
A list appears, showing all the items that need to be created to share the scene online.
Note:
If necessary, collapse some of the list items to hide the many building disciplines and categories.
ArcGIS Pro automatically identified the layers in the scene that are currently stored on your desktop computer and must be published to ArcGIS Online:
- The first item, De_Zalmhaven_Rotterdam, is the overall web scene wrapper.
- The two De_Zalmhaven_Rotterdam_WSL1 items will represent together the mid-rise building layer.
- The two De_Zalmhaven_Rotterdam_WSL2 items will represent together the high-rise building layer.
All the other layers (Bridges, Trees, and so on) already exist in ArcGIS Online and don't need to be republished.
You'll now configure the layers to ensure that they are using the first sharing method (web scene layers from scene layer packages).
- Point to the first occurrence of De_Zalmhaven_Rotterdam_WSL1.
A pop-up states that this will be a web scene layer.

- Hover over the second occurrence of De_Zalmhaven_Rotterdam_WSL1.
A pop-up states that this will be a web feature layer.
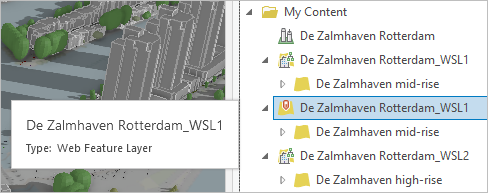
Currently, both the web scene layer and the web feature layer will be created in ArcGIS Online to represent the De Zalmhaven mid-rise in the scene.
You'll change the layer configuration to create as much of the content as possible on your computer and share only the resulting scene layer package to ArcGIS Online.
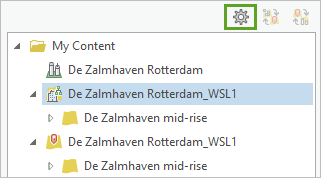
- On the Content tab, click the De_Zalmhaven_Rotterdam_WSL1 web scene layer to select it, and click the Configure Web Layer Properties button.
- In the Configure De_Zalmhaven_Rotterdam_WSL1 pane, click Configuration.
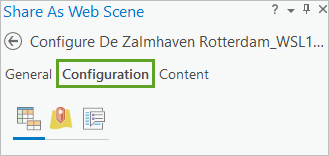
- For Caching, choose Cache locally and accept the default Temp cache location value.
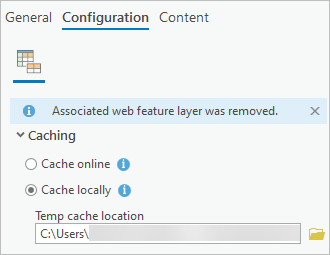
The scene layer package will be created in this local folder. The message Associated web feature layer was removed appears.
- Click the back button.

- In the Content list, point to the second occurrence of De_Zalmhaven_Rotterdam_WSL1.
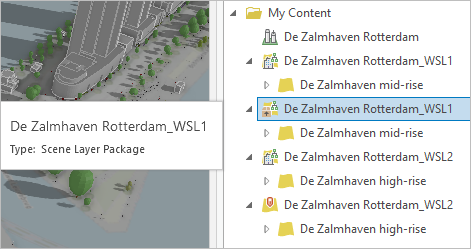
The pop-up states that this will now be a scene layer package (not a web feature layer).
- Repeat the same configuration change for the De_Zalmhaven_Rotterdam_WSL2 web scene, so that it also uses the Cache locally option.
- Check the icons or pop-ups of the items listed to ensure that the content listed is only web scene layers and scene layer packages.
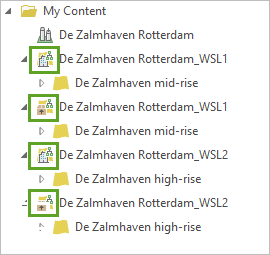
You'll now analyze the web scene to verify that there aren't any remaining issues that you need to address.
- In the Share As Web Scene pane, under Finish Sharing, click Analyze.

The Messages tab appears. Address any errors listed there and review any warnings.
Note:
In this tutorial, you get several warnings stating that empty building feature classes will be removed. This means that some building categories have no data and will not be published. This warning can be ignored.
You are now ready to publish the web scene to ArcGIS Online.
Note:
This operation uses some credits and can take 10 minutes or more, since a lot of data will be prepared and shared. If you prefer, you can read through the next few steps and continue the tutorial in the View the web scene section with this ready-made scene.
- Under Finish Sharing, click Share.

- Optionally, under Finish Sharing, click Jobs to monitor progress in more detail.

The Job Status pane appears, listing the layers that are currently being processed.
When the process is complete, in the Share As Web Scene pane, a green message box appears, informing you that the web scene was shared successfully.
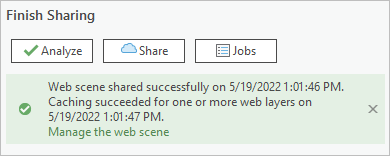
- Press Ctrl+S to save the project.
In this section, you published the scene to ArcGIS Online using the first sharing method (web scene layers from scene layer packages).
View the web scene
Now that the Zalmhaven Rotterdam scene is published to ArcGIS Online, you'll inspect it.
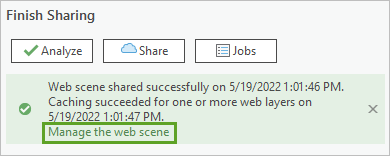
- In the message box, click the Manage the web scene link to open the web scene in a web browser.
Note:
To explore the ready-made scene instead, go to its item page.
The item page for the web scene appears in your default web browser. It lists all the information about the scene, including the list of layers it includes.
- Click Open in Scene Viewer.
The web scene appears. It is similar in content and appearance to the scene you built in ArcGIS Pro, and it is set on the last camera position you had chosen in ArcGIS Pro.
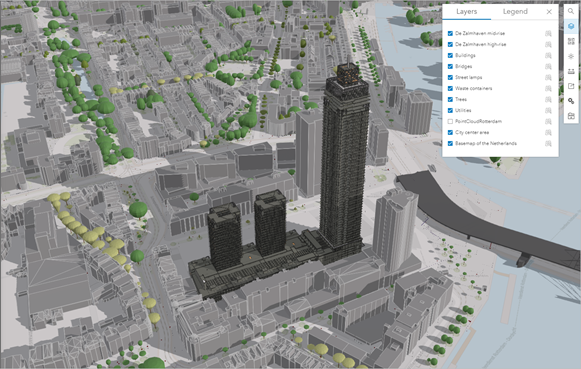
- Explore the web scene.
Note:
Use the mouse wheel button to zoom, click the left mouse button and drag to pan, and click the right mouse button and drag to rotate and tilt.
Alternatively, you can also use the navigation buttons below the Initial view button to achieve the same movements.
- Point to the ribbon at the bottom of the scene, and click the three slides one after the other.

The camera navigates smoothly from one view to the other. The slides correspond to the bookmarks you prepared in ArcGIS Pro.
In this section, you explored the web scene.
Explore the building layers with Building explorer
You'll now explore the De Zalmhaven buildings using the Building explorer.
- If necessary, click the De Zalmhaven complex slide to come back to the main view of the buildings.
- On the side toolbar, click the Building explorer button.

The Building explorer pane appears.
- In the Building explorer pane, expand the drop-down list and choose the De Zalmhaven mid-rise building.
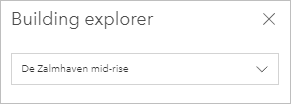
The view zooms in to the building.
- In the scene, if necessary, zoom out, pan, and rotate to have a good view of the mid-rise building.
- In the Building explorer pane, on the Level picker, click the second level from the top to select it.
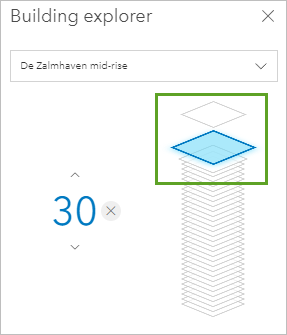
The top level appears in dark gray. For added context, the other levels appear in semi-transparent light gray.
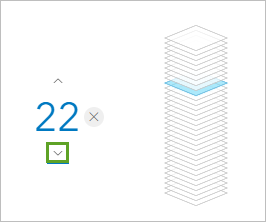
- Next to the Level picker, click the down button repeatedly to view each individual level.
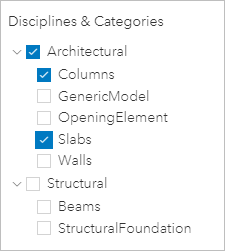
- Under Disciplines & Categories, turn on or off some of the disciplines and categories and continue to explore the different building levels.
- Next to the building picker, click Clear Level to go back to visualizing all the levels.
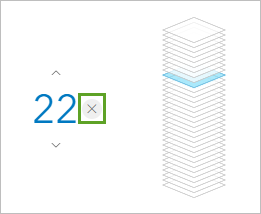
You can also learn more about every building element.
- In the scene, click any element of the mid-rise to select it.
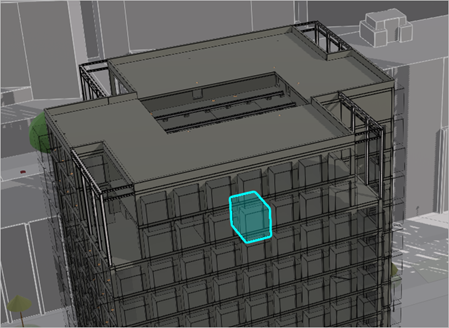
An informational pop-up appears, containing all of the element's properties. In the example, the category is OpeningElement, and this element will eventually host a window.
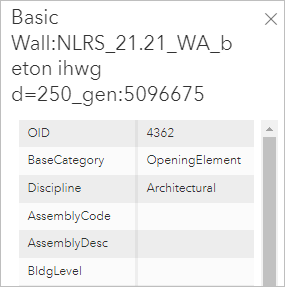
- Optionally, continue to explore various combinations of disciplines and categories for the entire building, and click several construction elements.
- In the Building explorer pane, expand the drop-down list and select the De Zalmhaven high-rise building.
- Explore various levels, disciplines, and categories for the De Zalmhaven high-rise.
- If necessary, turn back on all levels, disciplines and categories for both buildings.
Note:
Learn more about the Building explorer in the Explore building scene layers documentation.
Use the building filter
You'll now use the filter that you included in the scene to better understand the building foundation of the high-rise.
- If necessary, in the side toolbar, click the Building explorer button.
- If necessary, in the Building explorer pane, in the drop-down list, select the De Zalmhaven high-rise building.
- Click the options button to display the list of filters, and choose Foundation structure.
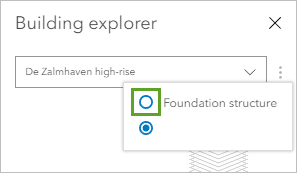
On the scene, the high-rise updates, showing only the foundation structure elements.
- Optionally, rotate, zoom, and pan to explore the foundation structure.
- In the Building explorer, click the options button and choose No predefined filter to turn the filter off.
On the scene, the high-rise updates to its full display.
- Optionally, turn on the Foundation structure filter for the mid-rise building if you created it earlier in the workflow.
Note:
Learn more about other Scene Viewer tools and options, such as Measure distance, Slice objects, Elevation profile, and Daylight/Weather, in the Get started with Scene Viewer documentation.
You applied the first sharing method (web scene layers from scene layer packages) to create a 3D web scene that shows the De Zalmhaven complex in its larger urban context. Then you inspected the scene in ArcGIS Online. This sharing method enables engaging visualization and exploration capabilities, while minimizing the use of credits. It is particularly well suited for public-use web scenes. Next, you'll create a web scene using the second sharing method.
Share a 3D scene with searching capabilities
In this second sharing scenario, you are a data manager for the City of Rotterdam. You want to share the web scene with the city inspectors who need to check various elements of the De Zalmhaven digital models against the schematics submitted by the contractor. You want the web scene to have the following capabilities:
- Offer a general visualization of the two buildings within the larger urban context.
- Enable a detailed exploration of the buildings' disciplines and categories, as well as building levels.
- Contain a filter to visualize the building foundation.
- Enable searching on specific building elements.
The latter capability requires using the second sharing method (web scene layers from associated feature layers), so that's the one you'll choose.
Prepare the scene for sharing
First, you'll ensure that the layers and scene view are set up as you want them to be published. Then you'll provide essential information about the web scene.
- In ArcGIS Pro, in the Contents pane, ensure that the two De Zalmhaven building layers have ExteriorShell turned off and all disciplines turned on.
- Set the scene to the De Zalmhaven complex bookmark.
Next, you'll enter the information for the new web scene.
- Close the Share as a Web Scene pane.
This will ensure that you don't keep any of the first sharing scenario's settings.
- On the ribbon, click the Share tab. In the Share As group, click Web Scene.
The Share As Web Scene pane appears.
- In the Share As Web Scene pane, for Name, type De Zalmhaven Rotterdam for inspectors and add your initials, for example, De Zalmhaven Rotterdam for inspectors YN.
- For Summary, type 3D scene showing the De Zalmhaven complex project in the Rotterdam city center. Includes layer searching capabilities, as well as various visualization options. Built as part of the tutorial: Share digital building models in a 3D web scene.
- For Tags, accept the current tabs.
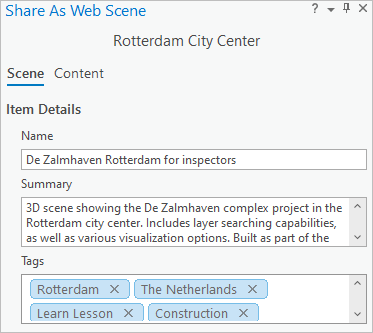
- Under Location, for Folder, accept the default, choose a destination folder in your ArcGIS Online account, or create a new one.
- For Sharing Level, choose Organization.
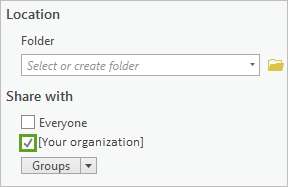
This will make the web scene available only to the users within your organization. It is the appropriate option in this scenario, as the city inspectors will be the ones using that web scene and it will not be available to the public.
Note:
Optionally, choose a specific group within the organization to restrict access further, for instance, the group of city inspectors. To learn more about access in ArcGIS Online, see Share items.
In this section, you set up the scene for sharing and provided essential information about the web scene. You will continue the sharing process in the next section.
Configure the web scene layers and share the scene
You will now configure the web scene layers and publish the scene to ArcGIS Online.
- In the Share As Web Scene pane, click the Content tab.
A list appears, showing all the items that must be created to share the scene online.
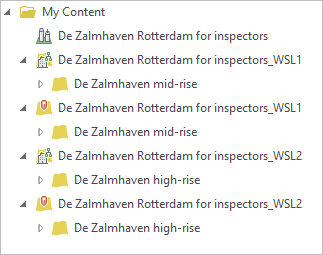
By default, the configuration values for these layers are already set to implement to the second sharing method (web scene layers from associated feature layers), so you'll mostly be accepting the defaults. However, to better understand the workflow, you'll review the configuration values.
- On the Content tab, click the De_Zalmhaven_Rotterdam_for_inspectors_WSL1 web scene layer to select it, and click the Configure Web Layer Properties button.
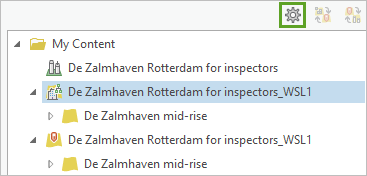
- In the Configure De_Zalmhaven_Rotterdam_for_inspectors _WSL1 pane, click Configuration.
- Under Caching, note that Cache online is the default option. Keep that value.
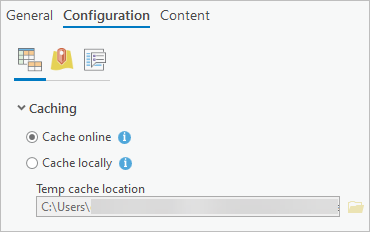
As desired with the second sharing method, the data will be prepared directly online, not locally. This means that a hosted feature layer will be generated, which supports searching and editing capabilities.
- Click Configure web layer properties.
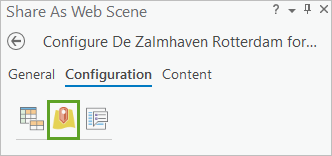
This is the tab where you can enable editing capabilities for the associated feature layer (both attributes and geometry). For instance, the users of the web scene can be enabled to edit the De Zalmhaven buildings themselves. In this tutorial, however, this is not a feature you need, so you'll leave these options unchecked and accept the default values.
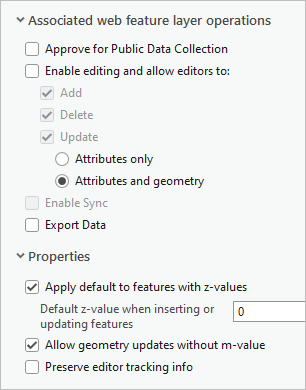
- Click the back button.

- Point to the first occurrence of De_Zalmhaven_Rotterdam_for_inspectors_WSL1.
A pop-up states that this will be a web scene layer.
- Point to the second occurrence of De_Zalmhaven_Rotterdam_for_inspectors_WSL1.
The pop-up states that this will be a web feature layer.

A web scene layer and web feature layer combination is what you want for the second sharing method. Together they will represent the De Zalmhaven mid-rise in the web scene.
- Check that De_Zalmhaven_Rotterdam_for_inspectors_WSL2 is also set up similarly.
Together, the two De_Zalmhaven_Rotterdam_for_inspectors_WSL2 layers will represent the De Zalmhaven high-rise.
You'll now analyze the web scene to verify that there aren't any remaining issues that you need to address.
- In the Share As Web Scene pane, under Finish Sharing, click Analyze.

The Messages tab appears. Any errors listed there must be addressed. Any warnings should be reviewed. With this sharing method, there should be neither.
You are now ready to publish the web scene to ArcGIS Online.
Note:
This operation uses some credits and can take 10 minutes or more, since a lot of data will be prepared and shared. If you prefer, you can read through the next few steps and continue the tutorial in the Set up the search capabilities section with this ready-made scene.
- Under Finish Sharing, click Share.

- Optionally, under Finish Sharing, click Jobs to monitor progress in more detail.
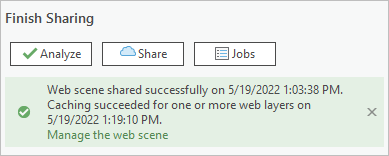
When the sharing process is complete, in the Shade As Web Scene pane, a blue message box appears, informing you that the web scene was shared successfully but that the online caching is still in progress.
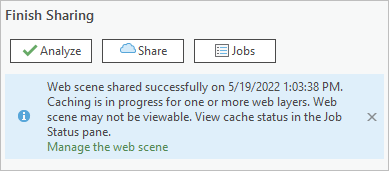
A few minutes later, a green message box appears, informing you that the online caching succeeded. The web scene is now ready.
- Press Ctrl+S to save the project.
In this section, you published the scene to ArcGIS Online using the second sharing method (web scene layers from associated feature layers).
Set up the search capabilities
Now that the Zalmhaven Rotterdam for inspectors scene is published to ArcGIS Online, you must set up its search capabilities to ensure that the city inspectors can use it to do their quality assurance work.
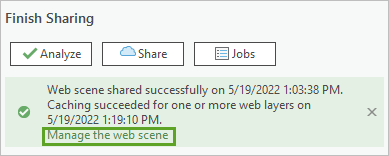
- In the message box, click the Manage the web scene link to open the web scene in a web browser.
Note:
To explore the ready-made scene instead, go to its item page. However, you can't change its search settings, as you don't own the scene. The search settings have already been set up for you. You can read through the next few steps and continue the tutorial in the View the web scene and explore the search capabilities section.
- When prompted, provide your ArcGIS credentials.
The item page for the web scene appears in your default web browser.
- On the blue toolbar, click Settings.

- Below the name of the web scene, click the Web Scene option.

- Under Application Settings, check the Enable Search box.
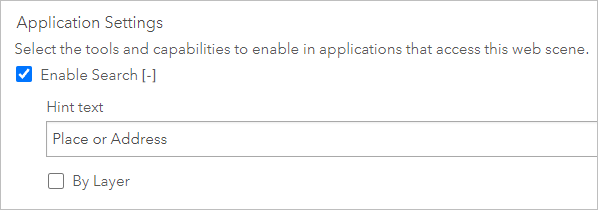
This enables searching in general for the scene and makes the search box appear in it. Next, you'll define two custom layer-based searches. The first one will enable users to search within the Beams layer.
- Check the By Layer box.
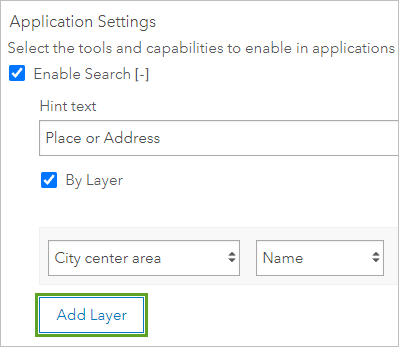
- Click the drop-down menu for City center area to see the options.
There are many options tp choose from as the list contains attributes for the mid-rise and the high-rise buildings. Each of them contains the attributes that you want to use, Beams and Columns, so you must select the correct one for the search to work properly.
- Scroll down nearly to the bottom of the list and click Beams.
Note:
Notice where the scroll bar is and verify that you are selecting the Beams attribute that is near the bottom of the list. This is the correct one for the high-rise building.
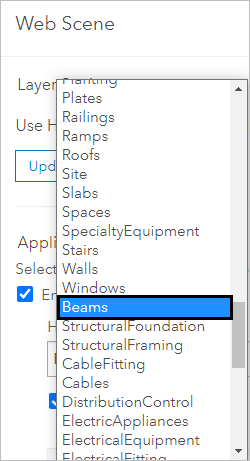
- Using the drop-down lists, form the following layer search: Beams Tag Contains.

The users will be able to retrieve a specific beam by entering its tag (or ID). You'll now add a second layer search that will enable searching within the Columns layer.
- Click Add Layer.

- Using the drop-down lists, form the following layer search: Columns Tag Contains.
Note:
Be sure to use the Columns attribute that is about half-way through the list, not the one at the top.
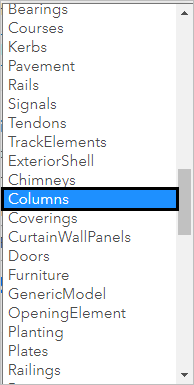
The search expression should appear as follows:

The users will be able to retrieve a specific column by entering its tag (or ID).
- Click Save.
Note:
You can set up more customized search options based on your needs.
In this section, you set up the custom search capabilities for your scene.
View the web scene and explore the search capabilities
You'll now open the web scene and test the search capabilities.
- On the blue toolbar, click Overview and Open in Scene Viewer.
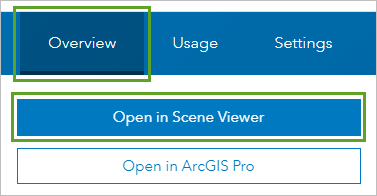
The web scene appears.
- Explore the web scene.
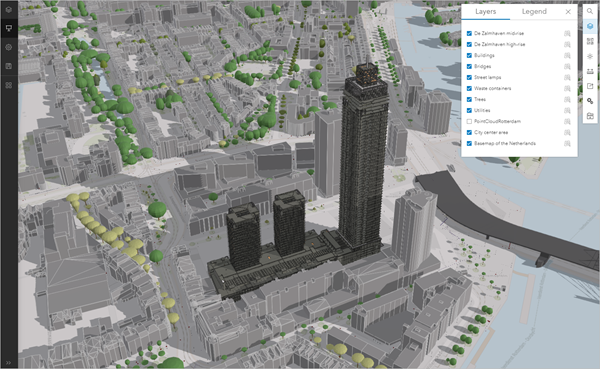
At first sight, this second web scene looks quite similar to the first one you published. It includes the same 3D visualization capabilities, the slides, the Building explorer tool, and the building filter.
- Optionally, try out all these capabilities, as you did for the first web scene.
However, what differentiates this second scene is its searching capabilities. You'll explore them now. First, you'll choose the building you want to search on and optimize its display to better see the search results.
- On the side toolbar, click Building explorer.

- In the Building explorer pane, expand the drop-down list, and choose De Zalmhaven high-rise.
- Under Disciplines & Categories, expand the disciplines, and turn off GenericModel, OpeningElement, and Walls. Keep all the other categories on.
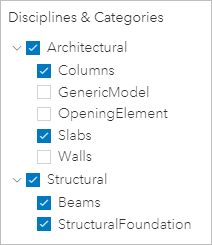
In the scene, the high-rise building updates. You will now perform some searches.
- On the side toolbar, click Search.

Note:
By default, the search box is set to the generic search capability. You can use it to search for street addresses in Rotterdam or other locations anywhere in the world.
You'll activate the Beams layer search that you set up earlier.
- On the Search pane, click the down arrow and choose Beams: Tag.
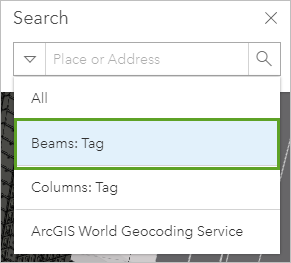
Supposing for a moment that you are a city inspector, you identified a beam in the constructor's schematics that bears the tag 12028830. You want to identify it in the web scene for comparison.
- In the search box, type 12028830 and press Enter.

The beam appears highlighted in the scene.
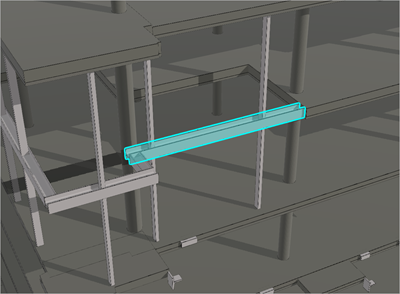
In an informational pop-up, the list of the beam properties are listed, for instance:
- For LoadBearing, the value is Yes.
- For IsExternal, the value is Yes.
- For Slope, the value is 0.00.
As a city inspector, you can now compare the information on the scene to the records submitted by the contractor.
Next, you'll search for a column that has the tag 4420785.
- On the side toolbar, click Search.
- Click the down arrow next to the search box, and choose Columns: Tag.
- In the search box, type 4420785 and press Enter.
The column appears highlighted in the scene along with its informational pop-up.
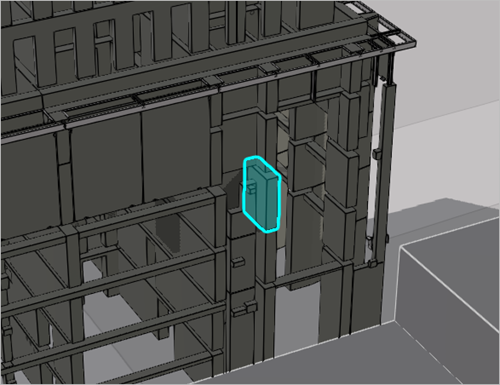
These custom layer searches will allow city inspectors to perform detailed quality assurance work.
In the last part of the tutorial, you applied the second sharing method (web scene layers from associated feature layers) to create a 3D web scene that includes search capabilities and allows city inspectors to perform their quality assurance work. Then you inspected the scene in ArcGIS Online and tested the search capabilities. This sharing method, which can also enable feature editing, is well suited for more advanced uses.
In this tutorial, you published two 3D scenes to ArcGIS Online to visualize the planned De Zalmhaven complex within its urban environment. Using a first sharing method, you produced a web scene for the Rotterdam community at large, so that residents can better visualize the upcoming construction in the city center. Using the second sharing method, you produced a web scene that can be used by city inspectors to perform advanced tasks requiring search capabilities.
You can find more tutorials like this in the BIM and GIS learning path.


