Merge multiple layers into one
Video
This tutorial is also available as a video.
For full details, refer to the written instructions below.
Note:
This video was recorded on April 30, 2025, using ArcGIS Pro 3.4.
Run the Merge tool
The Merge geoprocessing tool can merge together two or more layers, so long as they are of the same feature type. For example, it can merge two line layers but not a line layer with a point layer. You'll use it to merge two polygon layers representing land.
- Download the Norway project package.
A file named Norway.ppkx is downloaded to your computer. A .ppkx file is an ArcGIS Pro project package and may contain maps, data, and other files that you can open in ArcGIS Pro.
- Locate the downloaded file on your computer. Double-click Norway.ppkx to open it in ArcGIS Pro. If prompted, sign in with your ArcGIS account.
Note:
If you don't have access to ArcGIS Pro or an ArcGIS organizational account, see options for software access.
A map of Norway appears.

The map contains two polygon layers: NorwayLand (in light green) and NorwayMinorIslands (in dark green).

Note:
The data for this map is from Natural Earth.
For your project, it would be easier to manage all of the land polygons as a single layer, not two. You'll use the Merge geoprocessing tool to create a new layer containing all of the land areas.
- On the ribbon, click the Analysis tab. In the Tools group, click the expand button.

A gallery appears, listing some of the more commonly used tools.
- Scroll down. In the Manage Data group, click Merge.

The Geoprocessing pane appears with the parameters for the Merge tool. This tool combines multiple input layers into a single, new output layer.

Tip:
To read more about the Merge tool, click the help button in the Geoprocessing pane.

- In the Geoprocessing pane, for Input Datasets, choose NorwayLand and NorwayMinorIslands.
The Output Dataset field updates to NorwayLand_Merge.
- Click the Output Dataset field.
A path is revealed. By default, the new dataset will be stored in the project's geodatabase.

You'll accept the default location and name for the output dataset.
- For Field Matching Mode, accept the default choice, Automatically generate fields consolidated from all inputs.
- Click Run.
The tool runs and a new layer named NorwayLand_Merge appears in the Contents pane. On the map, you can see that the minor islands are now pale green. You'll turn off the other layers to ensure that all of the pale green features belong to the new layer.
- In the Contents pane, turn off the NorwayLand and NorwayMinorIslands layers.
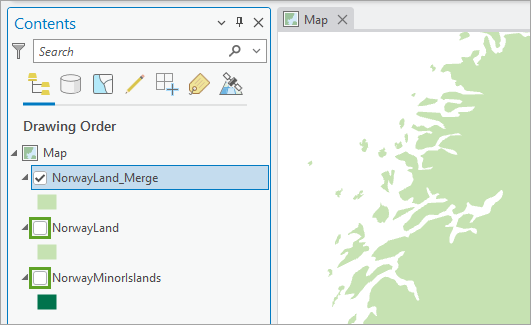
The merge appears to have been successful, placing all of the features from the two input layers into a single output layer.
Review attribute tables
The Merge tool doesn’t just merge spatial data, it also merges the attributes of both input layers. Next, you’ll review the attribute tables and determine whether any adjustments are needed.
- In the Contents pane, right-click NorwayLand_Merge and click Attribute Table.
The attribute table appears below the map.
- Scroll vertically through the table to review its contents.
Some of the fields have values for every feature, but the min_zoom, ORIG_FID, zoom_level, and Name fields only contain values for some of the features.
- Scroll to row 120.
The min_zoom and ORIG_FID fields only contain values for features that came from the NorwayLand layer (as indicated in the featurecla field), while the zoom_level and Name fields only contain values that came from the NorwayMinorIslands layer.
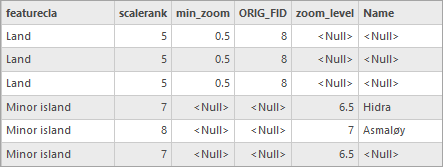
Sometimes, this kind of mixed output is acceptable for a merged layer. However, you can create a cleaner result. Next, you'll investigate these fields in the source layers and decide how they should be merged.
- Close the NorwayLand_Merge table.
- Open the attribute tables for the NorwayLand and NorwayMinorIslands layers.
- Above the attribute tables, right-click the NorwayMinorIslands tab and choose New Horizontal Tab Group.

You can now view both tables at the same time. You'll examine the fields that were mismatched in the output layer: min_zoom, ORIG_FID, zoom_level, and Name.
The min_zoom and zoom_level fields contain similar information. Both fields recommend zoom levels for displaying the features on web maps.
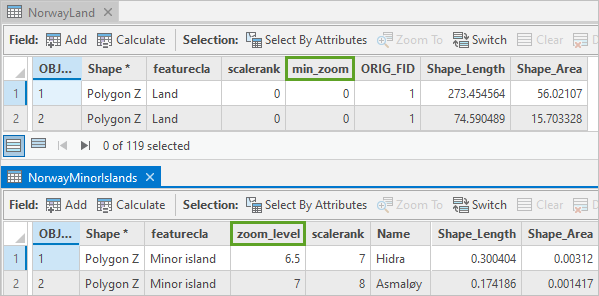
You'll merge these two fields into one in a new output layer.
The ORIG_FID field only exists in the NorwayLand layer and isn't necessary for your purposes. You'll remove this field from the output layer.
The Name field only exists in the NorwayMinorIslands layer. You'd like to preserve the names of islands, so you'll keep this field, even though most features will have a null value.
Configure the field map
Now that you have a plan for merging the attributes from the two layers, you'll rerun the Merge tool. This time, you'll use a field map to control how the attributes are merged.
- In the Geoprocessing pane, for Field Matching Mode, choose Use the field map to reconcile field differences.
- In the Field Map section, click Edit.

The Field Properties window appears.
- Under Fields, click featurecla (2).
The (2) label indicates that there are two source fields contributing to this output field. The information under Table indicates that both input layers have fields named featurecla.

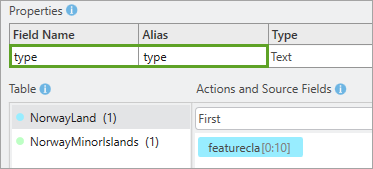
The contents of these two fields will be merged into a new featurecla field in the output layer. You'll change the name of the field in the output layer.
- In the Properties table, under Field Name, delete featurecla and type type. Also change the Alias to type.
- Under Fields, click min_zoom.

The Table section indicates that there is only one source for this field, from the NorwayLand layer.
- Under Table, click NorwayMinorIslands (0).

You have the option of adding a source field from the selected layer.
- Under Actions and Source Fields, scroll down and click zoom_level.

Now both the min_zoom and zoom_level fields will contribute to the new field in the output layer.
- Under Fields, click ORIG_FID.
Only one of the tables contains this field. You don't need this field in your new layer, so you'll remove it.
- Under Fields, point to ORIG_FID and click the Remove button.

You have already included the zoom_level values in the min_zoom field, so you can remove it too.
- Remove the zoom_level field.
The last field without a (2) label is Name. Earlier, you decided to keep Name as an output field. It is okay that it has only one source layer.

- In the Field Properties window, click OK.
Rerun the Merge tool
Now that the field map has been configured, you'll rerun the Merge tool and review the results.
- In the Geoprocessing pane, under Field Map, leave the Add source information to output check box unchecked.
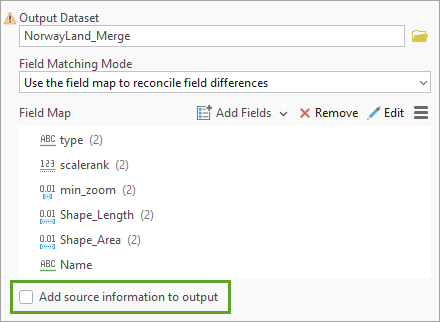
This option will add an extra field to indicate the source layer of each feature. However, the featurecla (now named type) field already does this, so adding extra source information is not necessary.
- Click Run.
The tool runs and the NorwayLand_Merge layer refreshes in the Contents pane. Because you did not change the Output Dataset name, the one you created earlier was overwritten.
- Close the NorwayLand and NorwayMinorIslands attribute tables.
- Open the attribute table for the NorwayLand_Merge layer.
- Scroll through the table to confirm that it contains features from both input layers, and that the fields were merged correctly.
There should be eight fields: OBJECTID, Shape, type, scalerank, min_zoom, Name, Shape_Length, and Shape_Area.

- Close the attribute table.
- In the Contents pane, right-click NorwayLand and choose Remove.

- Also remove the NorwayMinorIslands layer.
- On the Quick Access Toolbar, click the Save Project button.

- If you receive a message saying this project was created using a previous version, click Yes.
You have merged two polygon layers into one new layer. You used a field map to determine how mismatched fields would be merged in the new layer.
You can find more tutorials in the tutorial gallery.


