Manage your ArcGIS Online organization's members
Configure custom roles and new member defaults
Your company has interns joining for the summer who will need ArcGIS Online accounts to complete their projects. To prepare for their arrival, you’ll configure a custom role so that the interns will have only the privileges they need to complete their work. Then, you’ll set up new member defaults to quickly add the interns to your organization. New member defaults allow you to configure settings that will automatically be applied to members joining your organization and should include permissions or licenses broadly applicable to the users you plan to add.
- Sign in to your ArcGIS organization with your administrator account.
- On the ribbon, click Organization and choose the Settings tab.

- On the side of the page, click Member roles.
The Member roles page appears. It lists all the roles currently available to your organization, including default roles and any that you or another administrator has configured.

You’ll create a new custom role for the summer interns.
- On the Member roles page, click Create role.

The Create role window appears.
- In the Create role window, for Name, type Summer Intern Publisher.
You can create a role by using an existing role as a starting point or choosing a template that best matches the members' needs. The interns will be working on a variety of projects, but you want to remove the ability to create tiles and dynamic imagery layers.
- In the Role privileges section, click Set from existing role.

The Import setting from an existing role or template window appears.
- In the window, choose Publisher and click Import settings.

The privileges associated with the Publisher role are added to the Summer Intern Publisher role. You can customize the role by adding or removing privileges. You'll remove some privileges related to tiles and imagery that the interns will not need in their work.
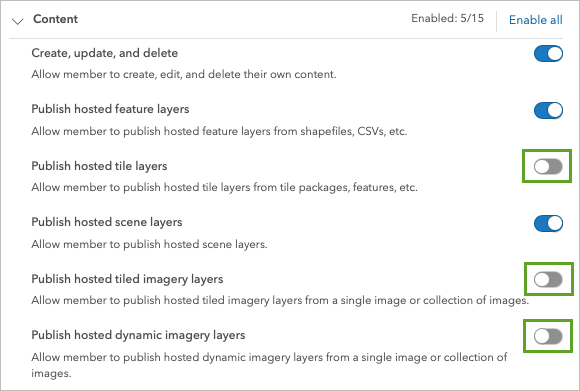
- Under General Privileges, expand Content and toggle the Publish hosted tile layers, Publish hosted tiled imagery layers, and Publish hosted dynamic imagery layers options off to disable them.

- For Description, type or paste Modified publisher role for summer intern program.
Caution:
You will be completing the tutorial using your own ArcGIS Online organization. As you work through the tutorial, you will be making changes to the organization. Some changes, like the addition of new members, will be undone when you complete the tutorial. Other changes will remain including the addition of a custom role, the change to new member defaults, and the addition of a new member category. - Click Save to save the customized role.
The Summer Intern Publisher custom role is now listed in the Member roles page and can be assigned to users.

Roles can be assigned as you’re adding a member to the organization, or they can be assigned to members already in the organization. Next, you’ll set the new member defaults to assign the Summer Intern Publisher role and some of the licenses that the interns will need to complete their work.
- On the side of the page, click New member defaults.
The New member defaults page appears.
- In the User type and role group, set User type to Creator and Role to Summer Intern Publisher. Click Save after each change.

- For Add-on licenses, click Manage add-on licenses and select ArcGIS Pro Standard. Click Save.
On the New member defaults page, you can also choose to set Member Categories and group membership. For now, you won't assign these settings, because you’ll configure categories later in the tutorial to sort the summer interns based on their team assignments. You'll leave the current settings for credit allocation, Esri access, and other options.
Next, you’ll add the interns to your organization.
- On the ribbon, click the Members tab and choose Invite members.

The Add members window appears.
To add the interns, you’ll use the Add members without sending invitations option, which allows you to create the accounts immediately but requires you to send the interns their credentials.
The Add members and notify them via email option creates a new account, but it won’t be activated until the user accepts the invitation sent to them and sets up a password.
Finally, the Invite members to join using an account of their choice option allows users to join an existing ArcGIS public account to the organization, adding their content and any other records associated with the user.
Note:
To use the Invite members to join using an account of their choice option, a user’s account can’t be associated with another organization, and any content that is added to the organization can’t be easily removed by the user if you choose to separate their account from the organization at a later date.
- In the Add members window, ensure Add members without sending invitations is selected and click Next.
- Click New members from file.

The Add members from a file page appears. You'll download a file that includes the interns' information needed to create the accounts, then upload it.
- Download the member_invite_csv to your Downloads folder. Drag it to the Drag and drop or browse for a csv file (UTF-8) box or use the Browse button to upload the member_invite_csv file.
Note:
The member_invite_csv file is a prepopulated version of the template that you can download from the Add members from a file page. To download a blank .csv template for your own organization, click Download CSV template.
The Review and fix pane appears, showing how each of the new members will appear in the organization.
- Ensure the Field errors column has no errors and click Next.

Note:
If an error is found, you can click Edit for the member and make any required changes. The most common reason for an error is duplicating an existing username; a username must be unique across ArcGIS Online. See the documentation to learn more about requirements for member usernames and temporary passwords.
- In the Add-on licenses pane, ensure that ArcGIS Pro is listed. Click Next.
- Click Add members.
After a few moments, the new members are added to the organization.
In this section, you created and configured a custom role for the incoming summer interns which provides the privileges and software licenses they'll need. You updated the new member defaults to use the new role and then added new members to the organization using a .csv file.
Next, you will manage your organization members using categories.
Manage members with categories
In addition to custom roles, categories can be used to sort and filter organization members. While member roles are tied to access permissions, member categories are a more lightweight, hierarchical method of organizing your members.
In the previous section, you assigned your summer interns a custom role to manage their privileges in the organization. In this section, you’ll create member categories based on two teams that the interns will be working with so you can make sure they’re seeing the correct content.
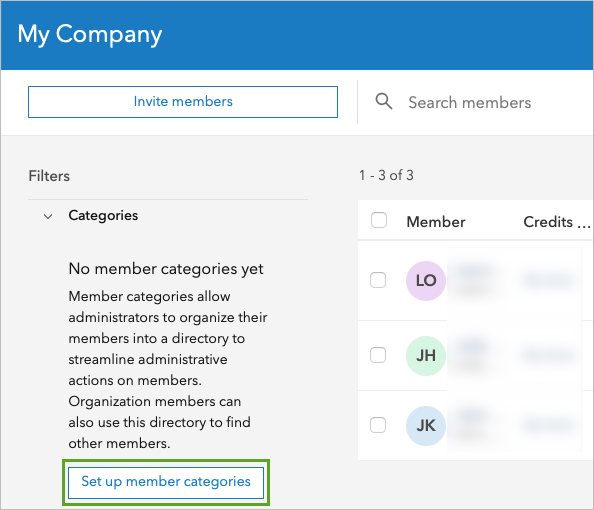
- On the ribbon, on the Members tab, click Set up member categories. Click Add category.

Note:
If your organization already has member categories configured, click Configure categories and click Add category below the list of existing categories.

The Configure member categories window appears. Categories can be configured however makes sense to your organization, business processes, data needs, and more. In this example, you’ll create categories for the teams within your company that the interns will be working with. Categorizing the interns’ accounts will make them easier to find and process in batch for tasks such as adding them to groups, sharing content, and other tasks.
Note:
In this example, you’re working with five users for the sake of demonstration. Categories can be effective in organizations of any size but can make large organization management especially efficient.
- In the Configure member categories window, in the text box, type Sustainable Planning and click Save.

The Sustainable Planning member category is created.
You can choose to add additional categories, or to create subcategories. You'll add a second category.
- Click the Add category button and type Ecosystem Restoration. Click Save.
- Close the Configure member categories window.
The categories you created are listed in the Filters pane.

Now you can assign members to the categories.
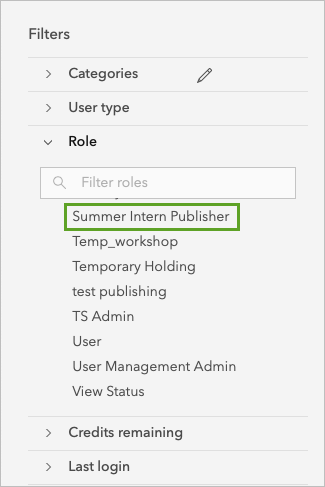
- On the Members tab, in the Filters pane, in the Role group, click the Summer Intern Publisher role.

Only the members in that role are listed.
- Check the boxes next to two of the intern accounts to select them. Above the members list, click Categorize.

The Categorize selected members window appears.
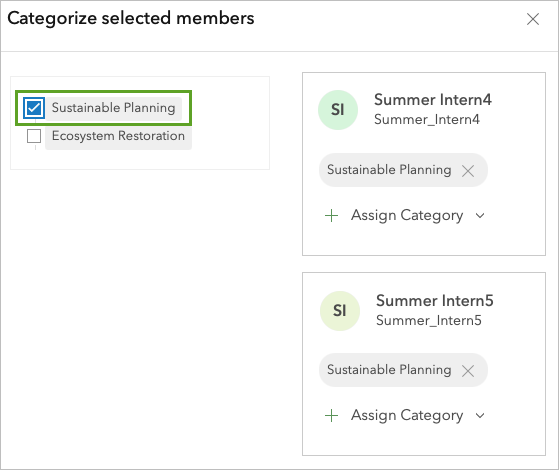
- In the Categorize selected members window, select the Sustainable Planning category and click Done.

Two of the five intern accounts have been categorized by the team where they'll work.
- Categorize the remaining three intern accounts with the Ecosystem Restoration category.
You have created new member categories and assigned user accounts with a specific role to the new categories.
Next, you will manage add-on licenses for your members.
Manage add-on licenses
You already gave the interns access to ArcGIS Pro when you added them to the organization. Now you’ll further customize the licenses available to them. The interns on the Sustainable Planning team will need access to the ArcGIS GeoPlanner app to complete a project.
ArcGIS Online is used to provision licenses to ArcGIS applications, including ArcGIS Pro, ArcGIS Business Analyst, and others. Like roles, licenses can be assigned when the user is added to the organization or changed after the user is a member.
- On the Members tab, select the Sustainable Planning category to show the two members.
- Select the two member accounts. Click Manage add-on licenses.

The Manage add-on licenses window appears. This window shows the licenses available to the members you’ve selected and what is already assigned to them. For a more detailed view of your organization’s licenses, you can use the Licenses tab.
- In the Manage add-on licenses window, under Applications select ArcGIS GeoPlanner and click Save.
The ArcGIS GeoPlanner add-on licenses are assigned to interns in the Sustainable Planning category. You can also manage licenses for individual members and for the entire organization.
You filtered members by their category and assigned selected members an add-on license for software they'll need for their work. Next, you'll populate one member's account with content they'll need.
Manage member content
As the administrator, you can change the ownership of content within your organization. This can be useful for moving content to an official company-branded account for external sharing, for transferring ongoing work to colleagues, and in many other cases. In this case, Intern 1’s prospective team has let you know that they’re assigning a particular project and would like to prepopulate the intern’s account with some of the content they’ll need to get started. You’ll save a map and move it to the intern’s account.
Tip:
You can also bulk reassign content to a user's account from the Members tab.
- On the ribbon, click the Map tab.
A blank map opens. You’ll save the map and transfer it to the intern’s account.
- On the Contents (dark) toolbar, click Save and open and choose Save as.

- In the Save map window, for Title, type Intern Project Map.
- For Summary, type or paste Starting map for Intern1’s project and click Save.
The map is saved to your account.
- On the Contents toolbar, click Map properties. In the Map properties pane, click Item details.

The map’s Item page opens in a new tab.
- On the Item page, for Owner, click Change owner.

- In the Change owner window, for New item owner, search for and select Summer_Intern1. Click Save.

The map is now owned by Summer Intern1 and will be available for them when they sign in to their ArcGIS Online account to begin work.
You created a new map, saved it to your own account and then transferred it to another member who will need it for their work. Next, you'll delete member accounts that are no longer needed.
Delete members
Once the interns have finished their summer internship with the company, it’s time to offboard them from the organization. For security reasons, and because you will likely want to reallocate each user type to someone else, you’ll remove the interns' accounts.
If the interns had signed in to the accounts, your first step would be to disable the accounts that are no longer active until you can assess any content the interns have created.
Members can’t be deleted if they have licenses assigned, or own content or groups. These and other options related to account removal are addressed in the deletion process. Once the intern accounts are removed from the organization their user types can be reallocated to others who use ArcGIS in their work.
- On the ribbon, click the Organization tab and click Members.
- For Filters, under Role, click the Summer Intern Publisher role to show the five members.
Tip:
It is recommended that you disable accounts when someone no longer needs access to your organization. Disabling the account will ensure they can’t sign in to the organization to view or edit content while you decide what to do with content and groups that the account owns.
Because you can’t disable accounts that have never been activated, you’ll move to deletion.
- For Summer Intern 1, next to Role, click More and choose Delete member.

The Delete member window appears. This window and the ones that follow, allow you to check for Esri access, transfer ownership of any content or groups that the member owns, and remove any licenses that would prevent the account from being deleted.
First, you’ll transfer the intern’s content. You can choose anyone in your organization to receive this content, such as the intern’s mentor or others on their project team. For now, you’ll add it to your account.
- For Before deleting this member, how would you like to manage their content and groups?, confirm Transfer content and groups is selected and click Next.
- For Transfer, for New owner, search for and select your administrator account.

Next, you’ll check for Esri access. Allowing Esri access, as you did when you created the intern account, gives the user access to some resources outside of the organization, such as Esri Training and the Esri Community.
Note:
If you don’t remove Esri access from the account before deleting it from your organization, the account is converted from an organizational account to a public account. While the public account won’t have any access to your organization, it is still available to use with Esri web resources such as My Esri and the Esri Community.
If the account to be offboarded has a username that includes your company’s name or branding, consider removing Esri access prior to deletion.
- Ensure the Keep Esri Access box is unchecked.

Now you’re ready to delete the intern’s account.
- Click Delete member.
The Delete member dialog box appears. Depending how many items, groups, and licenses the member has, this may take some time.

When the process is complete, the Members page appears and the intern's account is no longer listed.
- Repeat the process to delete the other four intern accounts.
Once the accounts are gone, the interns have been offboarded and you’re able to reallocate the user types.
In this tutorial, you learned strategies for adding, categorizing and deleting members.
