Create a geodatabase project
A geodatabase is a container for storing spatial and attribute data and the relationships that exist among them. In a geodatabase, features and their associated attributes can be structured to work together as an integrated system using rules, relationships, and topological associations. In other words, the geodatabase allows you to model the real world in a simple or complex manner as needs dictate.
Create a project using a template
The organization and structure of a geodatabase are generally referred to as its schema. Before developing a geodatabase schema for use by Salzburg tourism agencies, it is useful to investigate a generic basemap schema that can be deployed by organizations and agencies when requirements call for them to manage a specific collection of base or source data.
While there are several methods for creating a geodatabase, for this tutorial, you'll start by creating an ArcGIS Pro project from a template that includes a geodatabase. When you create a project, a new file geodatabase is automatically created and set as the default geodatabase. This geodatabase will store the data used by the Salzburg tourism agencies to support their mapping efforts.
Note:
It is common for cities, organizations, and agencies to maintain their own unique or proprietary data and supplement it with published and publicly available basemaps, map services, and other authoritative data sources such as those available in ArcGIS Living Atlas of the World.
- Download the Salzburg.zip file.
- Locate the downloaded file and extract it to your C:\ drive.
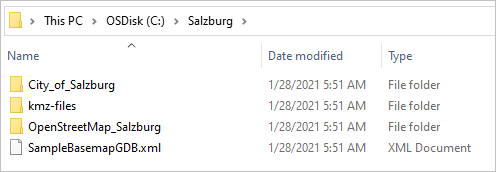
Your C:\Salzburg directory contains three folders and an XML document file.
Next, you'll start ArcGIS Pro, confirm a settings related to how metadata is displayed, and create a project.
- Start ArcGIS Pro. If prompted, sign in using your licensed ArcGIS organizational account.
Note:
If you don't have access to ArcGIS Pro or an ArcGIS organizational account, see options for software access.
When you open ArcGIS Pro, you're given the option to create a new project or open an existing one. If you've created a project before, you'll see a list of recent projects.
- Click Settings.
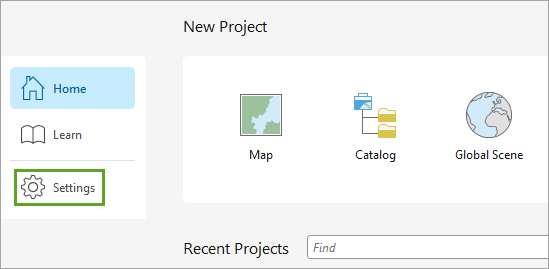
The About ArcGIS Pro page appears. From here, you can view and adjust options for the software.
- Click Options.
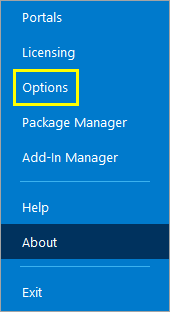
The Options window appears.
- In the Options window, click Metadata. If necessary, set Metadata style to Item Description.
This metadata style allows any metadata that you create to be viewed in multiple locations and carried with the project when it is transferred to other ArcGIS programs, such as ArcGIS Online.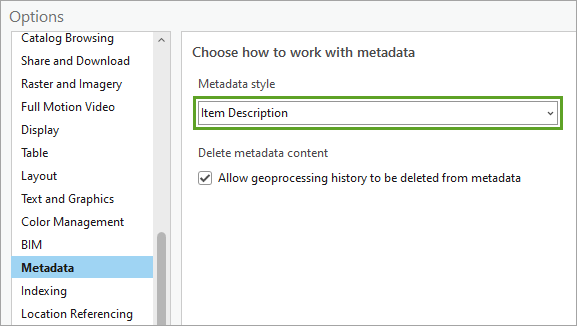
- Click OK.
You return to the start page. Under New, several project templates are listed. The Catalog template is a good choice if you are using ArcGIS Pro primarily for data management and don't necessarily need to create any maps. You can always add maps to the project later.
- Under New Project, click Catalog.
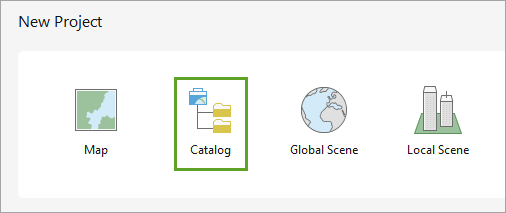
- In the New Project window, for Name, type Salzburg_Data_Management.
The Location field shows the default location of your project. You can use the default location or choose a new one. Noting the project's location is useful for when you need to find the project files in your computer's file browser.
Each new project includes a project file (.aprx), a default geodatabase, and a toolbox. It is often helpful to create a dedicated folder for these items and any future files you may collect for this project.
- Ensure that Create a folder for this project is checked and click OK.
The project is created. Because of the template you chose, it displays the Catalog view.
Add a folder connection
By default, your new project is not connected to the data you downloaded. By creating a folder connection, you can quickly access all data within a folder. A folder connection is a shortcut to locating important data and project-related materials. It also allows you to manage this data in the Catalog view. You'll create a folder connection to your extracted Salzburg folder.
First, you'll confirm that ArcGIS Pro is displaying the default panes. If you've used ArcGIS Pro before, you may not have the Contents and Catalog panes open by default.
- On the ribbon, click the View tab. In the Windows group, click Reset Panes and choose Reset Panes for Mapping (Default).
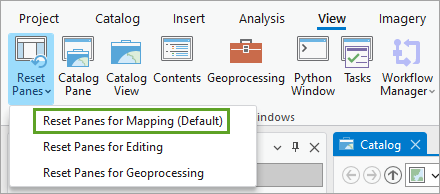
The Contents and Catalog panes are opened and other panes are closed. (If the panes were already open, you may see no change from before.)
The Catalog view, in the middle, allows you to access and manage all items associated with you project, whether they are available from a local or network computer, ArcGIS Online, or an ArcGIS Enterprise portal.
The Contents pane displays the contents of the active view. When a map view is active, the Contents pane displays the layers in the map. When the Catalog view is active, as it is now, the Contents pane displays the contents of the project, including collections of project items (toolboxes, databases, and so on), portal connections, and favorites.
The Catalog pane is similar to the Catalog view, but is designed for different tasks. The Catalog pane is good for quick access and the Catalog view is better for more in-depth data management tasks. It provides access to metadata and the ribbon controls provide more functionality than the pane.
In this tutorial, you'll use the Catalog view. You won't need the Catalog pane.
- Close the Catalog pane.
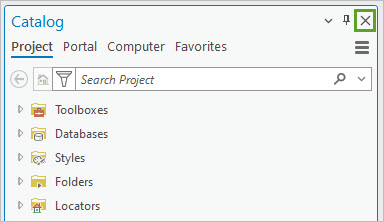
- In the Contents pane, expand Databases.
The Salzburg_Data_Management geodatabase was created automatically when you created the project. This geodatabase currently has no data. To access the data you downloaded earlier, you'll create a folder connection.
- In the Contents pane, right-click Folders and choose Add Folder Connection.
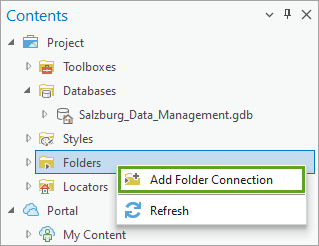
- In the Add Folder Connection window, browse to and select C:\Salzburg and click OK.
- In the Contents pane, expand Folders.
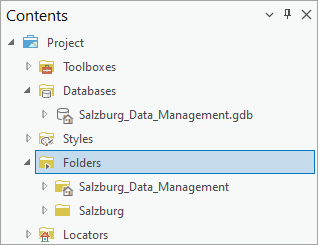
The project contains two folder connections. The Salzburg_Data_Management folder contains the project (also called the home folder). This folder connection was created automatically. The Salzburg folder connection is the one you just added.
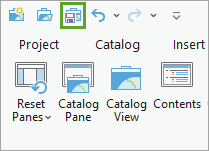
- On the Quick Access Toolbar, click the Save button.
You've created a project to support populating a geodatabase. You also downloaded data and added a folder connection to you project. Next, you'll evaluate various data sources to include in your geodatabase.
Evaluate data sources
Typical data quality criteria when evaluating a data source are relevance to your purpose; geographic extent; projection; currency; data and metadata standards; data lineage; spatial operations performed on data, including sampling, processing, modeling and analysis, accuracy, and completeness; and relevant attributes. Next, you'll evaluate potential data sources that will be migrated to the project geodatabase. These data sources include shapefiles and KMZ files.
Evaluate shapefile data
First, you'll look at data that comes in the form of a shapefile. A shapefile is a data storage format for spatial data.
- In the Contents pane, expand the Salzburg folder. Click the City_of_Salzburg subfolder.
The Catalog view updates to display a collection of shapefile data for the city of Salzburg. Basic information—such as the name and type—is listed for each file.
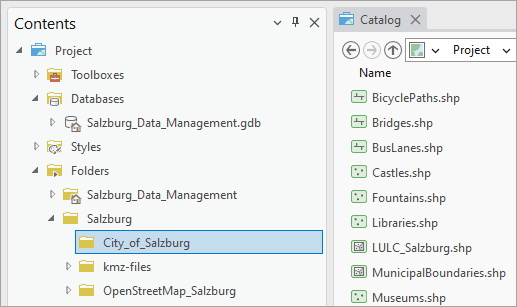
The City_of_Salzburg folder contains 30 shapefiles that tourism agencies can use to update maps and create apps. Before deciding which data sources to keep or which to replace with data from other sources, you should access and review each potential data source.
- In the Catalog view, click BicyclePaths.shp.
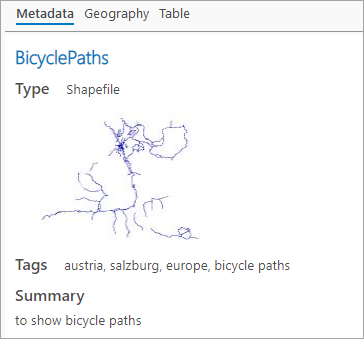
Metadata for the shapefile appears in the details panel next to the list of files.
Tip:
If you don't see the metadata, click the View tab on the ribbon. In the Options group, click Details Panel. Alternatively, click the Show/Hide Details Panel button at the bottom of the Catalog view.
The metadata includes information about credits, use limitations, and extent. It does not show the spatial reference (coordinate system) of the data. You can find this information in the Properties window.
- Right-click BicyclePaths.shp and choose Properties.
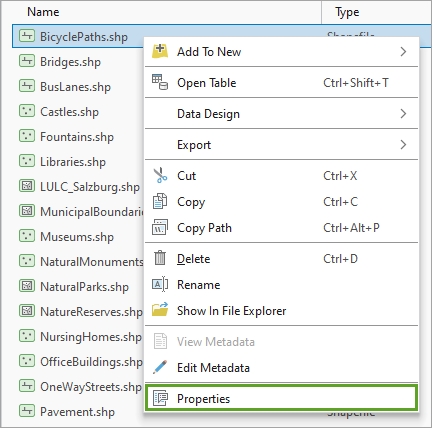
The Shapefile Properties window appears.
- On the Source tab, expand Spatial Reference.
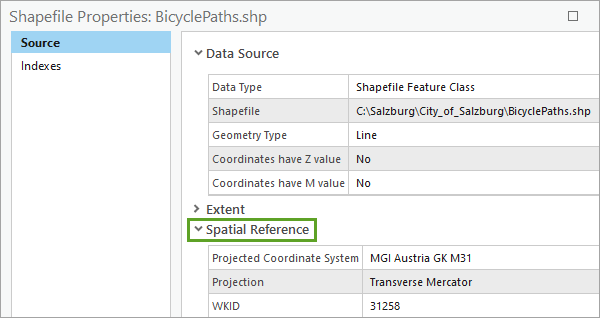
The BicyclePaths shapefile uses the projected coordinate system MGI Austria GK M31. The underlying geographic coordinate system is Militar-Geographische Institut. These coordinate systems were designed for use in Austria and so are a good option for your data.
Metadata is crucial in assessing the usefulness and relevance of a data source when developing a geodatabase. Metadata is stored with the item it describes: in the geodatabase for geodatabase items such as feature classes, in the project for project items such as maps, and in the file system for file-based items such as CSV files or spreadsheets. Metadata managed by ArcGIS is copied, moved, and deleted with its associated item.
- Close the Shapefile Properties window.
- In the details panel, click the Geography tab.
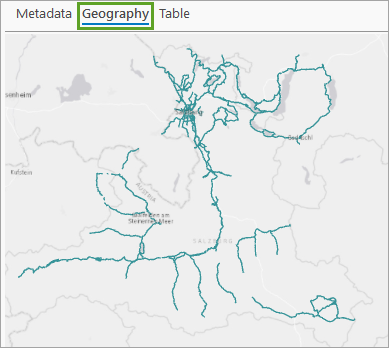
On this tab, you can view the spatial data on a map. You are also able to pan and zoom the map to explore the data in more detail.
- Click the Table tab.
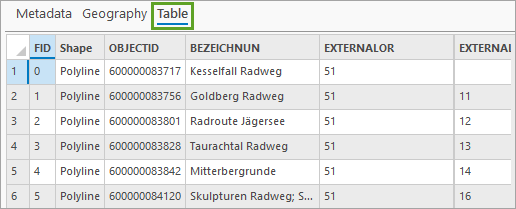
On this tab, you can view the attribute data associated with the map features.
- Review the Metadata, Geography, and Table tabs for ReligiousMonuments.shp.
The metadata for ReligiousMonuments.shp appears to be complete, but when you review the geography and the table, no features are visible. This is an empty shapefile, and as a result, this data source may be rejected.
Evaluate KML data
Next, you'll look at data that comes in the form of a Keyhole Markup Language (KML) file. KML is a file format used to display geographic data in an Earth browser.
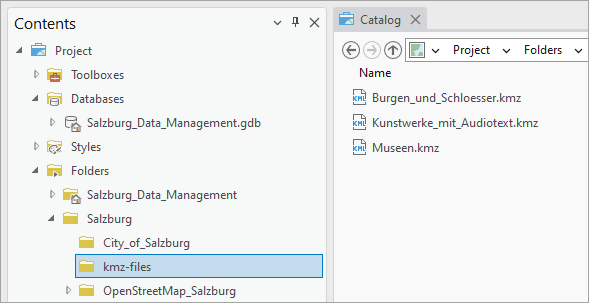
- In the Contents pane, under Folders, click the kmz-files subfolder.
This folder contains three KMZ files that would be useful for tourism agencies. A KMZ file is a compressed KML file that can be displayed by any KML client, including ArcGIS Pro.
Note:
KML is a common format for sharing geographic data with non-GIS users, as it can be easily delivered on the internet and viewed in a number of free applications. KML files have an XML-based format and can have either a .kml or .kmz (for compressed or zipped KML files) file extension. You can use either extension in ArcGIS Pro.
- In the Catalog view, click Kunstwerke_mit_Audiotext.kmz.
The features in this KML file represent the location of several significant open-air and indoor art installations that may be searched and visited by tourists interested in the work of specific artists.
- In the details pane, click the Metadata tab.
In this case, the KML file has no useful metadata. KML files also do not have a Properties window, so the coordinate system is not listed. However, KML only supports the WGS 1984 geographic coordinate system; therefore, some information is known about the data source. WGS 1984 is a general purpose global geographic coordinate system.
- Click the Geography tab.
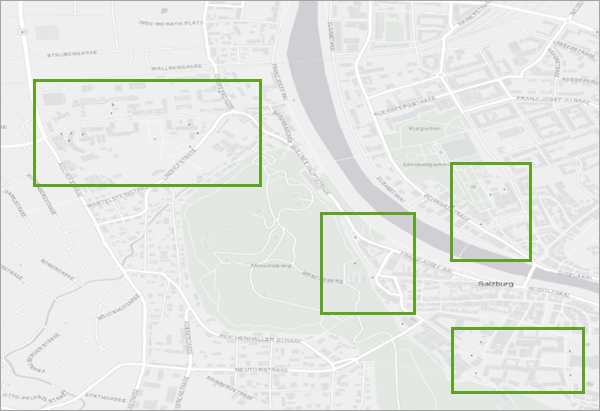
The features displayed do not scale well and are difficult to see. This is because the KML file includes its symbology and other layer properties, such as pop-up information.
Note:
A single KML file can be composed of a combination of point, line, and polygon features and raster imagery. KML can also contain related content such as graphics, pictures, attributes, and HTML. By contrast, datasets in ArcGIS are typically composed of homogeneous elements—for example, point feature classes contain only points.
- Click the Table tab.
KML files do not come with tables. KML files instead use a tag-based structure with nested elements and attributes based on the XML standard. To edit and modify the data, you can either open the KML file in a text editor or convert the file into a geodatabase feature class.
- In the Contents pane, under Folders, click the OpenStreetMap_Salzburg subfolder.
This folder contains a collection of free OpenStreetMap data for Salzburg in shapefile format that would be useful for building tourism maps and apps. The data is collected and built by volunteers and released with an Open Content License. The OpenStreetMap License allows free access to map images and all underlying map data.
- In the Catalog view, right-click OSM_Salzburg_Amenities.shp and choose Properties. Expand and review the Spatial Reference information.
This data is stored in the projected coordinate system WGS 1984 Web Mercator (auxiliary sphere), which is common for data intended for web maps, including OpenStreetMap. Its underlying geographic coordinate system is WGS 1984, the same as your KML data, but different from your other shapefile data, which used a spatial reference specific to Austria. It is important that all of the data in a map use the same underlying geographic coordinate system. Later, you'll choose one and transform the other data to match.
Note:
Every projected coordinate system contains an underlying geographic coordinate system. To learn more, read Geographic vs Projected Coordinate Systems.
- Close the Shapefile Properties window.
All of the shapefiles in this folder use the same Web Mercator coordinate system.
- Save the project.
Next, you'll import the geodatabase schema for a generic basemap using an XML file. Using the basemap, you'll explore geodatabase objects before updating the metadata for your Salzburg geodatabase. Updating the metadata is a preparatory step to migrating data sources from their current format and spatial reference into a suitable spatial reference for use in tourism maps and apps.
Prepare the geodatabase schema
The geodatabase storage model is based on a series of relational database concepts and uses an underlying database management system (DBMS). The DBMS provides the storage structure, indexing, backup and rollback mechanisms, and security model. DBMS tables and well-defined attribute types are used to store the schema, rule base, and spatial attribute data for each geographic dataset. This approach provides a formal model for storing and working with your data.
Add geodatabase metadata
You'll convert datasets to create the schema of your Salzburg geodatabase. In preparation for populating the Salzburg geodatabase, you'll edit and update your geodatabase metadata.
- In the Contents pane, under Databases, right-click Salzburg_Data_Management.gdb and choose Edit Metadata.
A metadata view appears.
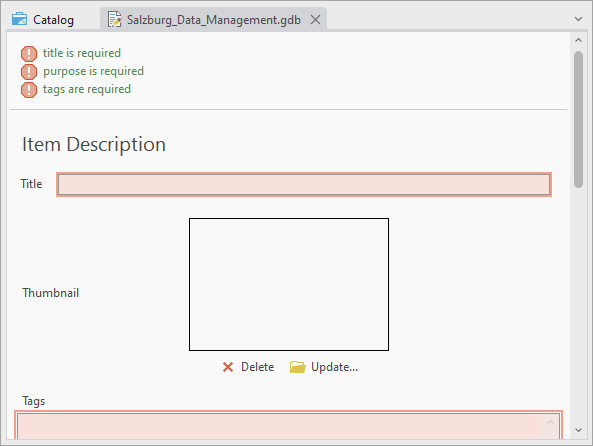
Required metadata elements are highlighted with red. Next, you'll populate them.
- In the metadata view, update the following information:
- For Title, type (or copy and paste) Salzburg Tourism Geodatabase.
- For Tags, copy and paste Salzburg, Austria, Visitor map, Tourism, Tourist, Visitor guide, Food, Activities, Attendees, Places to visit, Places to eat, Bike Routes, Ski Resorts, Museums, Art, Castles, Cathedrals.
- For Summary (Purpose), copy and paste Collection of data for the city and surrounding areas of Salzburg Austria.
- For Description (Abstract), copy and paste Geodatabase to store and manage a collection of spatial and attribute data that can be used by tourism agencies in the city of Salzburg, Austria to develop updated web maps and apps.
- For Credits, copy and paste the following information:
- STADT: SALZBURG https://maps.stadt-salzburg.at/
- National Mapping Agency - Federal Office for Metrology and Surveying (BEV) https://www.bev.gv.at
- Austrian Map online - https://maps.bev.gv.at/
- Land Salzburg - Open Government Data (OGD) - https://service.salzburg.gv.at/ogd/client/ and https://www.salzburg.gv.at/sagis/
- Austrian OGD basemap https://www.basemap.at/index_en.html
Tip:
When you author or update metadata content for an ArcGIS item, record the information that is important for your organization to know about that item. This may include how accurate and recent the item is, restrictions on using and sharing the item, important processes in its life cycle such as generalizing features, and so on.
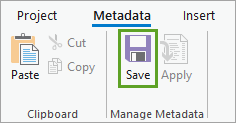
- On the ribbon, on the Metadata tab, in the Manage Metadata group, click Save.
- Close the metadata view.
- In the Contents pane, right-click Salzburg_Data_Management.gdb and choose View Metadata. In the Catalog view, click the Metadata tab.
The Catalog view details panel displays the updated metadata for your Salzburg Tourism Geodatabase.
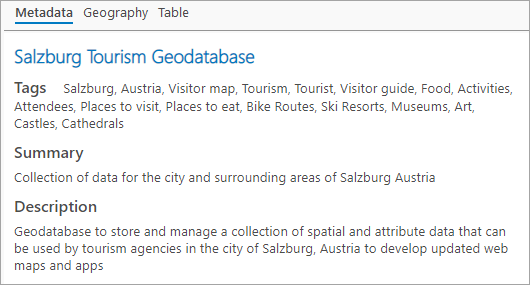
When metadata contains good descriptive information, you can find items with a search and evaluate which item in your search results is the correct one to use. You can improve communication and have confidence in making decisions based on an item's geospatial information. You can archive projects knowing they can be recovered, used, and evaluated in the future.
- Save the project.
Create feature datasets
Researching current tourism maps and online information for the city of Salzburg gives a good indication of which data themes various tourism agencies and private companies need to best serve visitors. These offer a good guideline for what data to add to your geodatabase. Most of the feature classes you build and later symbolize will most likely be displayed on current basemap layers published in ArcGIS Living Atlas of the World and other sources. Your feature classes will complement and supplement existing base data and serve to add value to the interactive web maps and apps that agencies may generate and publish.
The most popular maps and data used for Salzburg tourism include the following items:
- Detailed city map showing streets, pedestrian areas, and buildings
- Sightseeing map with tourist highlights
- Map with locations for markets and exhibitions
- Bus and rail stops and routes
- Creative walks, including architecture, museums, art galleries, churches
- Foot and cycling paths
- Beer routes, including breweries and taverns
- City and nature hiking trails
- Hotel maps
While working with your geodatabase, you can create empty feature datasets directly in the geodatabase. You'll start by creating feature datasets for the following four data themes:
- City attractions
- Transportation
- Scenic attractions
- Trails
- In the Contents pane, right-click Salzburg_Data_Management.gdb, point to New, and choose Feature Dataset.

The Create Feature Dataset geoprocessing tool appears. By default, Output Geodatabase is set to Salzburg_Data_Management.gdb.
- In the Create Feature Dataset tool, for Feature Dataset Name, type City_Attractions.
- For Coordinate System, click the Select coordinate system button.
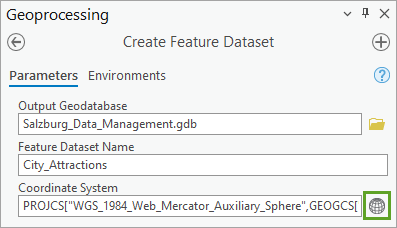
The simplest way to define the coordinate system for a geodatabase object is to import it from a current data source.
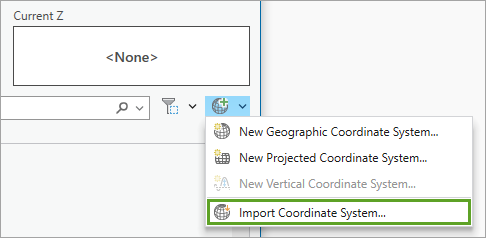
- In the Coordinate System window, click the Add Coordinate System button and choose Import Coordinate System.
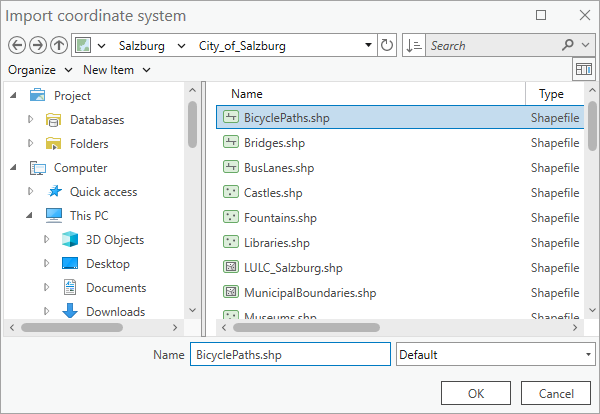
- In the Import coordinate system window, browse to the City_of_Salzburg folder (located at C:\Salzburg\City_of_Salzburg). Select BicyclePaths.shp and click OK.
- In the Coordinate System window, confirm MGI Austria GK M31 is displayed in the Current XY box.
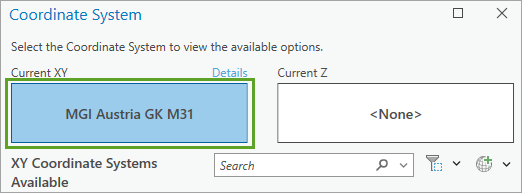
The MGI Austria GK coordinate system uses the Transverse Mercator projection and is an official projected coordinate system for cadastral mapping in Austria. M31 is one version of this coordinate system optimized for the region covering Salzburg.
- Click OK.
- In the Create Feature Dataset tool, click Run.
When the tool finishes, the City_Attractions feature dataset is added to the Salzburg_Data_Management geodatabase.
- In the Contents pane, click Salzburg_Data_Management.gdb. In the Catalog view, right-click City_Attractions and choose Edit Metadata.
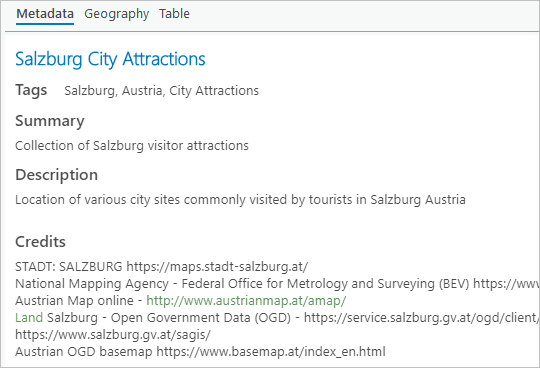
- In the City_Attractions metadata view, make the following updates:
- For Title, type (or copy and paste) Salzburg City Attractions.
- For Tags, type Salzburg, Austria, City Attractions.
- For Summary, copy and paste Collection of Salzburg visitor attractions.
- For Description (Abstract), copy and paste Location of various city sites commonly visited by tourists in Salzburg Austria.
- For Credits, copy and paste the following information:
- STADT: SALZBURG https://maps.stadt-salzburg.at/
- National Mapping Agency - Federal Office for Metrology and Surveying (BEV) https://www.bev.gv.at
- Austrian Map online - https://maps.bev.gv.at/
- Land Salzburg - Open Government Data (OGD) - https://service.salzburg.gv.at/ogd/client/ and https://www.salzburg.gv.at/sagis/
- Austrian OGD basemap https://www.basemap.at/index_en.html
Note:
You can also add a thumbnail to the metadata. To do so, for Thumbnail, click Update. Browse to and choose an image to use as the thumbnail.
- On the ribbon, on the Metadata tab, in the Manage Metadata group, click Save.
- Close the City_Attractions metadata view.
The metadata appears in the Catalog view.
Next, you'll make three more feature datasets. To do so efficiently, you'll run the Create Feature Dataset tool in batch mode. This way, you'll only need to run the tool once to create all three feature datasets.
- In the Geoprocessing pane, click the Back button.

A list of common and recently-used tools appears.
- Under Recent, right-click Create Feature Dataset and choose Batch.
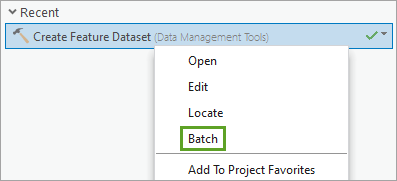
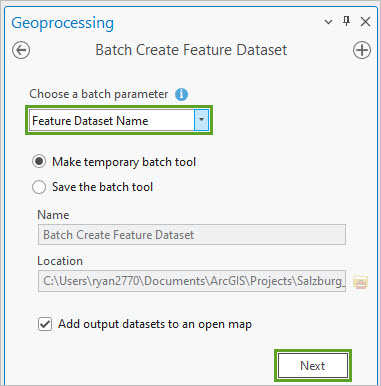
The tool appears in batch mode. You'll choose the batch parameter, which is the parameter that accepts multiple inputs. You want the output geodatabase and the coordinate system to remain the same for each feature dataset, but each feature dataset will have a different name, so you'll choose the name parameter as the batch parameter.
- For Choose a batch parameter, choose Feature Dataset Name. Click Next.
- For the Batch Create Feature Dataset tool, set the following parameters:
- For Output Geodatabase, confirm that the path is C:\Salzburg\Salzburg_Data_Management.gdb.
- For Batch Feature Dataset Name, type Scenic_Attractions and press Enter. In the second text box, type Transportation and press Enter, and in the third text box, type Trails.
- For Coordinate System, import MGI Austria GK M31.
- Click Run.
The new feature datasets are added to the Salzburg_Data_Management geodatabase.
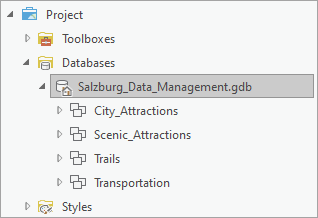
- Optionally, update the metadata for the additional feature datasets.
- Save the project.
Next, you'll migrate several data sources from the City_of_Salzburg, KMZ files, and OpenStreetMap_Salzburg folders into SalzburgDataManagement.gdb.
Populate the geodatabase
You can add data to a geodatabase by importing and converting from source data formats into feature classes. First, you'll look at migrating shapefiles into the geodatabase.
Import a single shapefile
A shapefile is a legacy data format that is still popular but has limitations that hinder its use as an efficient data storage type. It is similar to a feature class and therefore directly maps to the geodatabase as a single feature class when you migrate it to the geodatabase.
- In the Geoprocessing pane, click the Back button.
- Search for and choose the Export Features tool.
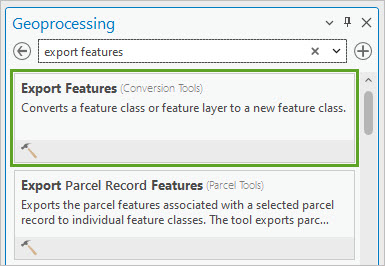
The Export Features geoprocessing tool opens. This tool allows you to select a single data source to import into the geodatabase. In addition, you can rename the output feature class and choose which source attribute fields to retain or remove from the source data.
- For Input Features, browse to the OpenStreetMap_Salzburg folder and choose OSM_Salzburg_HistoricSites.shp.
- For Output Feature Class, browse to the Salzburg_Data_Management geodatabse and choose the City_Attractions feature dataset.
- For Output Name, type Historic_Sites and click Save.
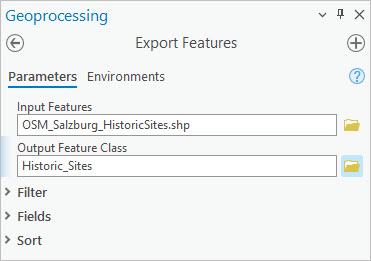
- Expand Fields.
In the Field Map section, the Output Fields list shows the attribute fields that will be copied to the output dataset. To exclude a field from the output dataset, select the field and click Remove. To remove multiple fields, press Shift+Ctrl to select the fields and click Remove on any field name.
- In the Output Fields list, remove all fields except the following:
- HISTORIC
- NAME
- ADDR_HOUSE
- ADDR_HOU00
- ADDR_STREE
- ADDR_CITY
- ADDR_STATE
- ADDR_POSTC
- ADDR_PLACE
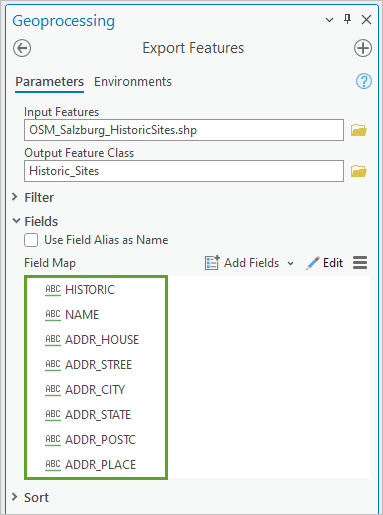
- Click Run.
Note:
The coordinate system of the input shapefile is WGS_1984_Web_Mercator_Auxiliary_Sphere. When the shapefile is converted to a feature class in the City_Attractions feature dataset, its coordinate system is automatically reprojected to MGI Austria GK M31. A feature dataset cannot contain a feature class that has a nonmatching coordinate system.
- In the Contents pane, right-click City_Attractions and choose Refresh.
- In the Catalog view, click Historic_Sites.
On the Metadata tab of the details panel, the original shapefile metadata has been copied to the new geodatabase feature class.
- In the Catalog view, right-click Historic_Sites and choose Edit Metadata.
- In the metadata view, update the following information:
- For Title, enter Salzburg Historic Sites.
- For Tags, enter Salzburg, Austria, Historic sites.
- For Summary (Purpose), enter Point features of historic sites in Salzburg Austria.
- For Description (Abstract), enter Location of historic sites in Salzburg Austria.
- For Credits and Use Limitation, leave the default text, as these fields are populated from source metadata.
- Set Appropriate Scale Range to City 1:50,000 to Buildings 1:5,000.

- On the ribbon, on the Metadata tab, in the Manage Metadata group, click Save.
- Close the metadata view.
Export multiple feature classes
Exporting or importing a single shapefile is useful if you need to convert only selected features and choose specific attribute fields to be copied to the output feature class. Sometimes it is necessary to batch convert multiple sources for quick conversion and spend time later removing unnecessary attribute fields.
- In the Contents pane, under Folders, expand the Salzburg folder and click the City_of_Salzburg folder.
- In the Catalog view, right-click Castles.shp, point to Export, and choose Feature Class(es) To Geodatabase.
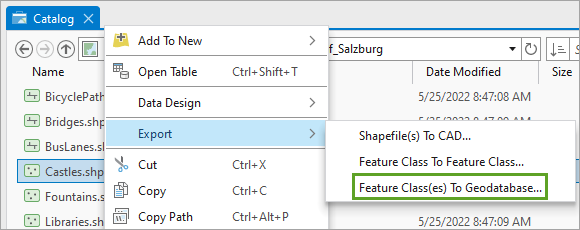
The Feature Class To Geodatabase geoprocessing tool opens. The Input Features parameter is already filled, but you can add more shapefiles as inputs before running the tool.
- Next to the second Input Features box, click the Browse button.
- Browse to the City_of_Salzburg folder and click Museums.shp. Click OK.
- For Output Geodatabase, browse to Salzburg_Data_Management.gdb and choose the City_Attractions feature dataset.
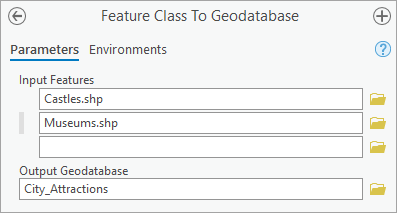
- Click Run.
The tool runs.
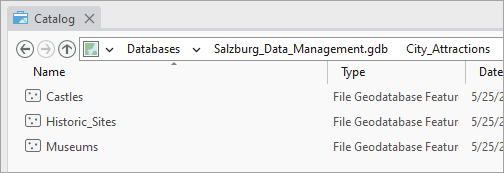
- In the Contents pane, click City_Attractions. Confirm that the City_Attractions feature dataset contains three feature classes.
- In the Contents pane, under Salzburg_Data_Management.gdb, right-click Scenic_Attractions, point to Import, and choose Feature_Class(es).
- In the Feature Class To Geodatabase tool, for Input Features, browse to the City_of_Salzburg folder and add the following shapefiles by pressing Ctrl to select multiple shapefiles at the same time:
- NaturalParks.shp
- NatureReserves.shp
- Skilifts.shp
- SkiSlopes.shp
- SwimmingHoles.shp
- Waterbodies.shp
- Waterwheels.shp
- In the Feature Class To Geodatabase tool, for the blankInput Features row, browse to the OpenStreetMap_Salzburg folder and add the following shapefiles by pressing Ctrl to select multiple shapefiles at the same time:
- OSM_Salzburg_CableCar.shp
- OSM_Salzburg_CableCarStations.shp
- OSM_Salzburg_NaturalFeatureBoundaries.shp
- OSM_Salzburg_NaturalFeatures.shp
- OSM_Salzburg_ReceationSiteBoundaries.shp
- OSM_Salzburg_RecreationSites.shp
- OSM_Salzburg_Streams.shp
You now have 14 input features added to the Feature Class To Geodatabase tool pane.
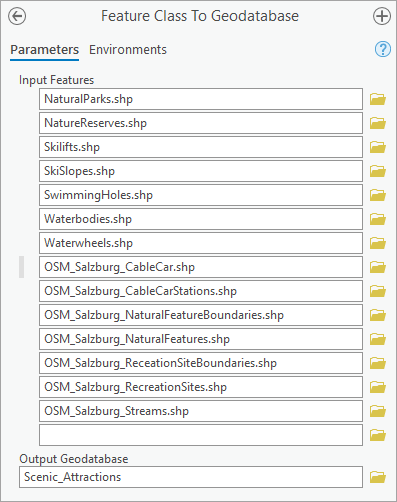
The Output Geodatabase parameter is correctly set by default to the Scenic_Attractions feature dataset.
- Click Run.
The tool runs. Because you have so many input features, it may take a minute to complete.
- In the Contents pane, click the Scenic_Attractions feature dataset.
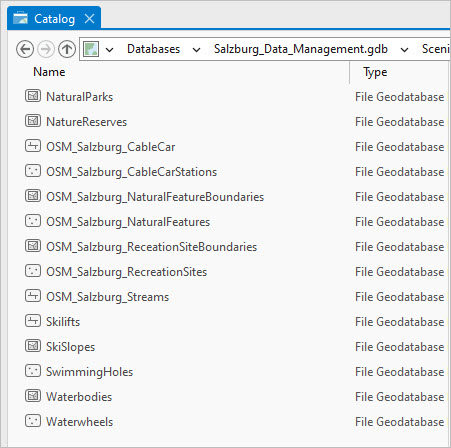
The 14 input features you chose are now contained in the feature dataset. You'll rename some of them to use simpler names.
- In the Catalog view, rename the feature classes as shown in the following table.
Tip:
There are three ways to rename a feature class:
- Right-click the feature class and choose Rename.
- Click the feature class to select it and press F2 to make its name editable.
- Click the feature class to select it and click it again to make its name editable.
Original name New name OSM_Salzburg_CableCar.shp
CableCar
OSM_Salzburg_CableCarStations.shp
CableCarStations
OSM_Salzburg_NaturalFeatureBoundaries.shp
NaturalFeatureBoundaries
OSM_Salzburg_NaturalFeatures.shp
NaturalFeatures
OSM_Salzburg_RecreationSiteBoundaries.shp
RecreationSiteBoundaries
OSM_Salzburg_RecreationSites.shp
RecreationSites
OSM_Salzburg_Streams.shp
Streams
- Optionally, update metadata for Scenic_Attactions.
- Use the Feature Class To Geodatabase to import the following shapefiles to the Transportation feature dataset.
Source folder Source shapefile City_of_Salzburg
BicyclePaths.shp
BusLanes.shp
OneWayStreets.shp
Pavement.shp
RoadNetwork.shp
Sidewalks.shp
Tunnels.shp
OpenStreetMap_Salzburg
OSM_Salzburg_Airports.shp
OSM_Salzburg_PublicTransportStations.shp
OSM_Salzburg_Railroads.shp
OSM_Salzburg_RailroadStations.shp
- After the shapefiles are imported, in the Contents pane, click Transportation. In the Catalog view, rename the following feature classes:
Original name New name OSM_Salzburg_Airports.shp
Airports
OSM_Salzburg_PublicTransportStations.shp
PublicTransportStations
OSM_Salzburg_Railroads.shp
Railroads
OSM_Salzburg_RailroadStations.shp
RailroadStations
- Optionally, update metadata for the Transportation feature classes.
Import KML files
Several useful tourism-themed data sources are only available as KML files. You'll use the KML To Layer tool to convert a .kmz file to a file geodatabase.
- In the Contents pane, under Folders, browse to the kmz_files subfolder and select it.
In the Catalog view, there are three .kmz files.
Because you already have a museums layer in your geodatabase, you'll convert only the Burgen_und_Schloesser.kmz and Kunstwerke_mit_Audiotext.kmz files. These are features representing castles and palaces and the location of art installations by recognized artists.
- In the Geoprocessing pane, click the Back button. Search for and open the KML To Layer tool.
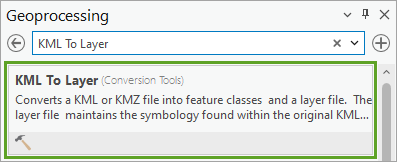
The KML To Layer tool converts a KML file with its features, which are XML based, into a unique geodatabase specific to the KML file being converted. The features, such as points and polygons, are then added as separate feature classes to a Placemarks feature dataset within this geodatabase. After performing this conversion, you can use the geographic data in these feature classes from your KML file in the same ways you would use any other GIS data.
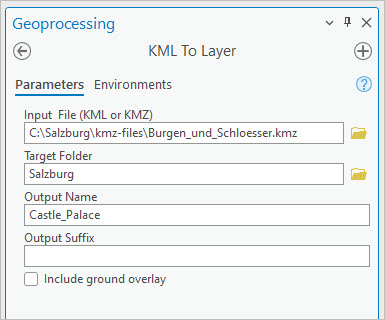
- In the KML To Layer tool, set the following parameters:
- For Input KML File, browse to the kmz-files folder and select Burgen_und_Schloesser.kmz.
- For Target Folder, choose C:\Salzburg.
- For Output Name, type Castle_Palace.
- Click Run.
The tool creates an output file geodatabase named Castle_Palace.gdb and an output layer file named Castle_Palace.lyrx inside the Salzburg folder.
- Run the KML To Layer tool a second time with the following parameters:
- For Input KML File, browse to the kmz-files folder and choose the Kunstwerke_mit_Audiotext.kmz file.
- For Target Folder, choose C:\Salzburg.
- For Output Name, type Art_Installations.
- Click Run.
The tool creates an output file geodatabase named Art_Installations.gdb and an output layer file named Art_Installations.lyrx.
- In the Contents pane, expand the Salzburg folder and confirm that Art_Installations.gdb and Castle_Palace.gdb have been created.
- Expand the geodatabases and confirm that each contains a feature dataset named Placemarks.
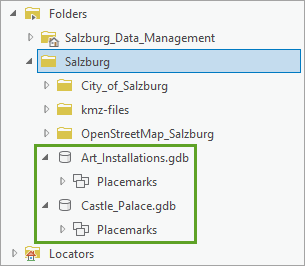
- Under Art_Installations.gdb, click the Placemarks feature dataset.
In the Catalog view, the feature dataset contains a feature class named Points. This feature class contains the converted KML point features.
- Rename the Points feature class to Art_Installations.
- In the Contents pane, under Castle_Palace.gdb, click the Placemarks feature dataset. Rename the Points feature class to Castle_Palace.
- In the Catalog view, browse to the Art_Installations point feature class. Right-click the feature class and choose Copy.
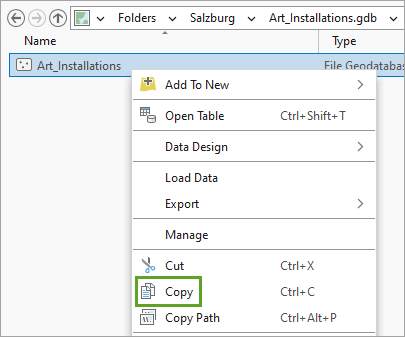
- In the Contents pane, under Salzburg_Data_Management.gdb, right-click the City_Attractions feature dataset and choose Paste.
A message appears, reporting that the process has failed. This is expected, because the spatial references of the source feature class and the target feature dataset do not match.
The original KML file—and thus the converted feature class containing points—uses the GCS_WGS_1984 coordinate system. The target City_Attractions feature dataset uses the MGI_Austria_GK_M31 coordinate system. The copy and paste operation failed because all feature classes in a feature dataset must have the same coordinate system. However, you can export the feature class into the feature dataset with the Feature Class To Geodatabase tool. The tool automatically projects the source data into the coordinate system of the feature dataset.
- Close the error window. In the Catalog view, right-click the Art_Installations feature class, point to Export, and choose Feature Class(es) To Geodatabase.
In the Feature Class to Geodatabase tool, Art_Installations is selected by default as an input feature class. You'll add the Castle_Palace feature class also.
- In the Contents pane, under Castle_Palace.gdb, click Placemarks.
- In the Catalog view, drag Castle_Palace to the Geoprocessing pane. Drop it on the empty Input Features box.
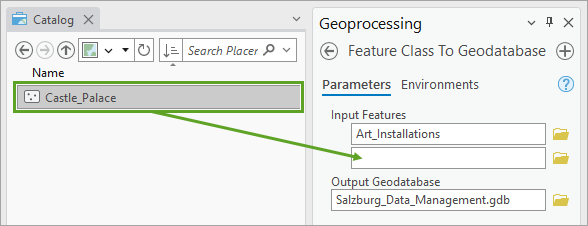
You can populate the Output Geodatabase in the same way.
- In the Contents pane, expand Salzburg_Data_Management.gbd. Drag City_Attractions and drop it on the Geoprocessing pane in the Output Geodatabase parameter.
Output Geodatabase is now set to City_Attractions.
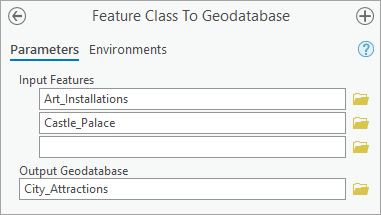
- Click Run.
The feature classes are successfully added to the City_Attractions feature dataset.
- In the Contents pane, click the City_Attractions feature dataset.
In the Catalog view, confirm that the feature classes appear.
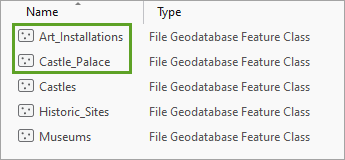
- Optionally, update the Art_Installations and Castle_Palace feature class metadata.
Your Salzburg_Data_Management geodatabase now has several feature classes organized into thematic feature datasets that will be useful for tourist agencies to maintain and update to generate new and improved maps and apps for tourists visiting the city of Salzburg.
Before sharing the geodatabase with stakeholders for feedback, you'll do some geodatabase management.
Prepare the geodatabase for review
A file geodatabase is stored as a folder of binary files on disk. When you first add data to a file geodatabase, the records in each file are in order and are accessed efficiently by the file system. However, as you delete and add records over time, the records in each file become unordered, and unused space develops as records are removed and new ones are added elsewhere in the file. This causes the file system to perform more record-seeking operations in each file, slowing the rate at which records are accessed. Since you were adding feature datasets and feature classes by importing various source datasets into your geodatabase, you were in essence editing the geodatabase and thereby impacting geodatabase performance.
You'll reorder records and remove unused space by compacting your geodatabase. Compacting a frequently edited geodatabase cleans up storage and unused space while also reducing the size of each file. If you frequently add and delete data, you should compact your file geodatabase on a monthly basis. You should also compact a geodatabase after any large-scale change.
- In the Contents pane, right-click Salzburg_Data_Management.gdb and click Manage.
The Database Properties window appears.
- In the Database Properties window, under Manage geodatabase functionality, check Compact. Click OK.
Tip:
To see a history of your geoprocessing operations, including Compact, click the Analysis tab on the ribbon. In the Geoprocessing group, click History.
Note:
In addition to compacting a geodatabase, you can apply compression. A compressed dataset, when distributed, is read-only and therefore cannot be edited or modified in any way except for changing its name and modifying attribute indexes and metadata. Compression is ideal for datasets that do not require further editing, and this may be a suitable way to deliver your initial geodatabase to stakeholders for review without giving them the ability to modify source data features.
Next, you'll generate an XML workspace document to share the schema for your geodatabase. Sharing a geodatabase schema can be useful for review and collaboration with others. Sometimes an organization will make copies of a geodatabase schema to use in different departments.
- In the Contents pane, right-click Salzburg_Data_Manaement.gdb, point to Export, and choose Geodatabase To XML Workspace Document.
The Export XML Workspace Document tool appears.
- In the Export XML Workspace Document tool, confirm that the Input Data parameter is set to Salzburg_Data_Management.gdb and that Output File is set to Salzburg_Data__ExportXMLWork.xml.
- For Export Options, choose Schema only.
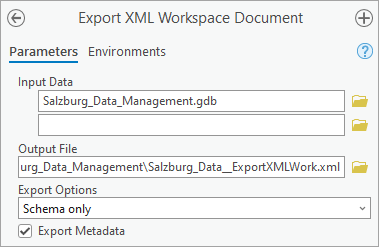
Exporting the data can take a long time. For sharing the full geodatabase with both its schema and its data, there are several alternatives to consider. These include using the Copy tool or Clip tool to extract subsets of the data or using the Package toolset to consolidate, package, and share layers, map documents, and results.
- Click Run.
Tip:
If you specify an Output File name with a .zip file extension, the resulting XML file is saved in a compressed .zip file.
- When the tool finishes, in the Contents pane, under Folders, click the Salzburg_Data_Management home folder. In the Catalog view, confirm that the XML document appears.
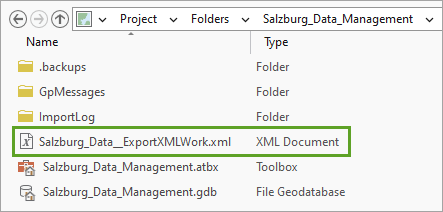
You may now distribute and share your output XML workspace document with stakeholders for review and comments.
- Save the project.
In this tutorial, you created an ArcGIS Pro project to support the creation of a geodatabase. You used the Catalog view to interact with project components and manage the geodatabase. You created several feature datasets and imported various feature classes. You also added metadata to geodatabase items and compressed the geodatabase to make it more efficient.
You can find more tutorials in the tutorial gallery.
